Installation Sametime 9 on Linux : the Sametime Proxy
Non root installation of Sametime 9 Proxy server
In the wiki, it states that you need to install using root. I do not know why this is, since both Installation Manager and WebSphere Application Server can be installed as non-root .
Prepare
Warning : I’m using CentOS 6.5 - which is not supported by IBM. This means none of this is supported as such .
To be able to use scp and ssh, install openssh-clients as well on the server:
yum install openssh-clients
yum install xorg-x11-xauth
yum install xorg-x11-apps
yum install xorg-x11-utils
yum install xorg-x11-font\*
yum install wget
yum install libcanberra-gtk2
Make sure you installed :
- DB2 V10.1 (as per this blog post : install-db2-v10.1.htm
- LDAP server : TDS installation
- System console : Sametime System console
- Configured security in System Console : Configure LDAP
Create the OS user you want to run the environment with .
[root@stssc ~]# groupadd -r was
[root@stssc ~]# useradd -r -g was -m was
[root@stssc ~]# echo passw0rd | passwd was --stdin
Changing password for user was.
passwd: all authentication tokens updated successfully.
Install Installation Manager
Extract the installer to a directory of your choice an go to that directory.
This is an installation as a non-administrator user, so as the was user we created earlier. In addition, this is the console installation.
[root@stssc]$ su - was
[was@stssc ~]$ cd /mnt/hgfs/hostroot/local/Downloads/IBM/Sametime/90/InstalMgr1.6.2_LNX_X86_64_WAS_8.5.5/
[was@stssc InstalMgr1.6.2_LNX_X86_64_WAS_8.5.5]$ ./userinstc -acceptLicense

Installed com.ibm.cic.agent_1.6.2000.20130301_2248 to the /home/was/IBM/InstallationManager/eclipse directory.
Log files are in the user’s home directory, in this case :
/home/was/var/ibm/InstallationManager/logs
Start Installation manager to make sure it works :
[was@stssc ~]$ cd /home/was/IBM/InstallationManager/eclipse/
[was@stssc eclipse]$ ./IBMIM
Install WAS ND 8.5.5
Extract the installation files, and combine into a single directory. This means moving the disk2 and disk3 directories into the first directory extracted.
Prepare a responsefile
This is the responsefile for a non-root installation :
WASv85.nd.install.xml
It should contain your repository location, and the features to install. The rest is optional.
You need to install the full WAS profile, with the 64 bit SDK and ejbdeploy. Do not select liberty.
Prepare the installation directory
Create the directory /opt/IBM/ that is writeable as the user “was”. As root :
[root@stssc opt]# mkdir /opt/IBM
[root@stssc opt]# chown was:was /opt/IBM
Install WebSphere 8.5.5
Run the installer with reference to the response file (as the user “was”)
su - was
cd /home/was/IBM/InstallationManager/eclipse
./IBMIM --launcher.ini silent-install.ini -input /mnt/hgfs/hostroot/local/Doc/INSTALL/sametime9/WASv85.nd.install.xml -log /tmp/wasinstall.log -acceptLicense -showVerboseProgress
or, with a keyring for authentication :
su - was
[was@stssc eclipse]$ ./IBMIM --launcher.ini silent-install.ini -input /mnt/hgfs/hostroot/local/Doc/INSTALL/sametime9/WASv85.nd.install.xml -log /tmp/wasinstall.log -acceptLicense -showVerboseProgress -keyring /home/was/imkeyring.kyr -password passw0rd
Verify the log files in the Installation Manager’s log directory for errors.
Install the Sametime Proxy Server
Install the Hot Fix 1 version of the Sametime Proxy Server without installing the version 9.0 server first. The updated version of the Sametime Proxy Server installs with the same procedure as the version 9.0 server, except that you will point to the repository provided with the Hot Fix 1 package.
This is the latest fixpack at the time of writing :
9000-ST-Proxy-FP-JCHG-9EGGAT
Extract the Sametime Proxy Server file from the 9.0.1 hotfix (SametimeProxyServer.zip)
Create Proxy database
On the DB2® server, log in as the DB2 administrator (db2inst1) .
Go to the DatabaseScripts/ProxyServer directory in the extracted directory and run the createDb scripts :
[root@stssc ~]# su - db2inst1
[db2inst1@stssc ~]$ cd /mnt/hgfs/hostroot/local/Downloads/IBM/Sametime/90_fixes/SametimeProxyServer/DatabaseScripts/ProxyServer/
[db2inst1@stssc ProxyServer]$ ./createProxyDb.sh STPROXY db2inst1
Processing...

DB20000I
e CREATE DATABASE command completed successfully.
DB20000I
e UPDATE DATABASE CONFIGURATION command completed successfully.
DB20000I
e UPDATE DATABASE CONFIGURATION command completed successfully.

Database Connection Information

Database server
= DB2/LINUXX8664 10.1.0
 SQL authorization ID
= DB2INST1
 Local database alias
= STPROXY

 *** createProxyDb.sh: skipping granting privileges to self
 ...etc...

 DB20000I
The SQL DISCONNECT command completed successfully.
List the databases. You should have at least 2 (the System Console database and the newly created Proxy database).
[db2inst1@stssc ProxyServer]$ db2 list db directory

System Database Directory

Number of entries in the directory = 3

Database 1 entry:

Database alias = STPROXY
Database name = STPROXY
Local database directory  = /home/db2inst1
Database release level = f.00
Comment =
Directory entry type = Indirect
Catalog database partition number = 0
Alternate server hostname =
Alternate server port number =

Database 2 entry:

Database alias = STSC
Database name = STSC
Local database directory  = /home/db2inst1
Database release level  = f.00
Comment =
Directory entry type = Indirect
Catalog database partition number = 0
Alternate server hostname =
Alternate server port number  =

...
Log out of the database server.
Connect the System Console to the Proxy database
The Sametime system console needs to know about the newly created database.
Open the Sametime System Console , on https://sametimeconsole:8701/ibm/console
Log in with the WebSphere Administrator, in my case named dmgrwasadmin (in the installation of the System Console Installation of the Sametime System Console
Navigate to Sametime System Console/Sametime Prerequisites/Connect to Database
Select “Add”
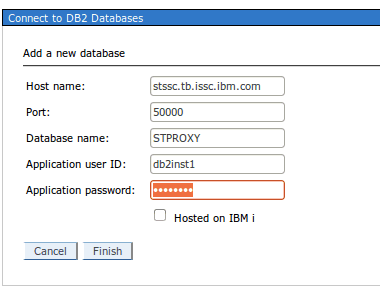
Enter the details of the DB2 database you created earlier.
Click “Finish”
You should now have at least 2 configured databases .
Generate passwords
You need to export the variable below , because we’re at a non-standard location with our installation manager.
[was@stssc generateEncodedPassword]$ export IM_INSTALL_LOCATION=/home/was/IBM/InstallationManager
[was@stssc generateEncodedPassword]$ ./generateEncodedPassword.sh passw0rd
Prepare responsefile
This is my responsefile to install a Meeting Server using the Sametime System Console , for a non-root install :
The repository points to the extracted Proxy files , from the latest fixpack.
Create deployment plan
Open the Sametime System Console , on https://sametimeconsole:8701/ibm/console
Log in with the WebSphere Administrator, in my case named dmgrwasadmin (in the installation of the System Console Installation of the Sametime System Console)
Navigate to Sametime System Console/Sametime Guided Activities/Install Sametime Proxy Server.
Select “New Deployment Plan”
Name it (must match with what you put in the responsefile - in this case STProxy1 )
Select the version
Select the type. I need a “Primary Node” - this will put the Proxy server into the Cell I already have (the Cell created when installing the Sametime system console)
Select the Deployment Manager
Enter the hostname of your system where you want the Proxy server installed. As userid, use something that’s unique. This userid will never be actually used since the Meeting server will be federated to the Cell during installation and you will manage it from the SSC.
Connect to the Community server (select the correct one, in my case, STCommunity32)
Select the STProxy database.
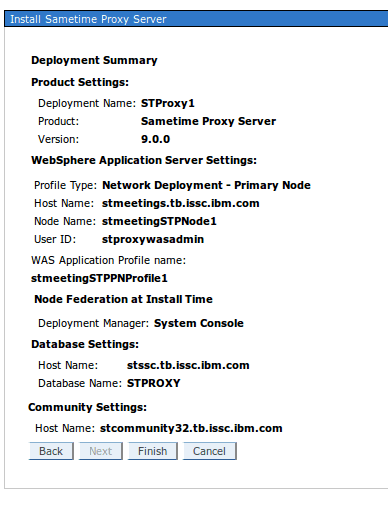
This is the summary.
The Profile name still can’t be modified nor can the Node name.
Install
Install the Proxy server using these commands (as the user “was”) :
[was@stssc opt]$ cd /home/was/IBM/InstallationManager/eclipse/tools
[was@stmeetings tools]$ ./imcl -acceptLicense -showProgress -input /mnt/hgfs/hostroot/local/Doc/INSTALL/sametime9/proxy/IP_ssc.rsp -log /tmp/proxy.log
25%
50%
75%
100%
------------------|------------------|------------------|------------------|
.............................job InstallJob in IBM® Sametime® Server Platform; com.ibm.lotus.sametime.proxyserver 9.0.0.20131215_2235 features: CEMain,nossc,ssc
entered verifyWASversion
size :18
pre upgrade check
job InstallJob in IBM® Sametime® Server Platform; com.ibm.lotus.sametime.proxyserver 9.0.0.20131215_2235 features: CEMain,nossc,ssc
printing
job InstallJob in IBM® Sametime® Server Platform; com.ibm.lotus.sametime.proxyserver 9.0.0.20131215_2235 features: CEMain,nossc,ssc
relativeUrlFormat : /console/deployment/depNamelist?DepName=param0&ProductType=param1
relativeUrlFormat : /console/deployment?DepId=param0
relativeUrlFormat : /console/deployment?DepId=param0
Checking Operating System
Operating System check completed
Checking Operating System
Operating System check completed
job InstallJob in IBM® Sametime® Server Platform; com.ibm.lotus.sametime.proxyserver 9.0.0.20131215_2235 features: CEMain,nossc,ssc
.job InstallJob in IBM® Sametime® Server Platform; com.ibm.lotus.sametime.proxyserver 9.0.0.20131215_2235 features: CEMain,nossc,ssc
entered verifyWASversion
size :18
pre upgrade check
job InstallJob in IBM® Sametime® Server Platform; com.ibm.lotus.sametime.proxyserver 9.0.0.20131215_2235 features: CEMain,nossc,ssc
.......................................true
before getting connection helper
Jan 20, 2014 11:29:09 AM null null
WARNING: ADMC0046W
Jan 20, 2014 11:29:09 AM null null
WARNING: Could not find tmx4jTransform.jar in null/etc/tmx4jTransform.jar - Interoperability to older versions of WebSphere is disabled
Jan 20, 2014 11:29:09 AM null null
INFO: ssl.disable.url.hostname.verification.CWPKI0027I
Jan 20, 2014 11:29:09 AM null null
INFO: Client code attempting to load security configuration
Jan 20, 2014 11:29:09 AM null null
INFO: Client code attempting to load security configuration
after getting connection helper
in isRemoteMbeanAvailable
getAdminClient
objectSet
Jan 20, 2014 11:29:09 AM com.ibm.sametime.console.admin.plugins.wsadmin.ClusterConfigImpl isRemoteServerTimeSynched
INFO: Comparing system clocks...
Jan 20, 2014 11:29:09 AM com.ibm.sametime.console.admin.plugins.wsadmin.ClusterConfigImpl isRemoteServerTimeSynched
INFO: System time on deployment manager: 1390213749943
Jan 20, 2014 11:29:09 AM com.ibm.sametime.console.admin.plugins.wsadmin.ClusterConfigImpl isRemoteServerTimeSynched
INFO: System time on node: 1390213749640
relativeUrlFormat : /console/deployment?DepId=param0
SSC is avaialble for Federation.
Federation lock acquired on SSC Dmgr.
.......
Installed com.ibm.lotus.sametime.proxyserver_9.0.0.20131215_2235 to the /opt/IBM/SametimeServer directory.
You can start he proxy server now, however you won’t be able to login yet.
http://stmeetings.tb.issc.ibm.com:9081/stwebclient/index.jsp
Configure the Community server
Single Sign on
Trusted IP
You need to add the Proxy server’s IP address to the Trusted IP list of the Community Server :
Use the Sametime System Console, go to Sametime Servers/Community Servers and open your Community Server.
Add the IP Address of the Sametime Proxy (and Meeting) to the Trusted Servers list.
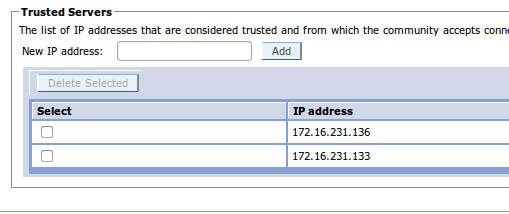
Click “OK” to save the change and restart the Community Server.
Configure the Proxy server
Sametime Proxy and Meeting Server on the same host
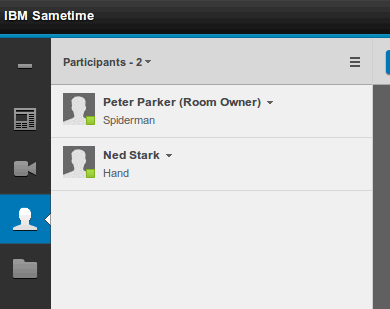
You need separate IP Addresses (and separate hostnames) for your Proxy and Meeting Server if you install them on the same node. I was actually assuming it would work in Sametime 9 with the same hostname, so I tried it out first so you don’t have to (it didn’t work in previous versions).
If you don’t, you won’t be able to have online awareness using the ST Proxy in your Meetings, as is shown in the picture below (this is what you will have if everything works).
Virtual Host
Create Virtual host entries
Create a new virtual host (Environment/Virtual hosts) for your Proxy server.
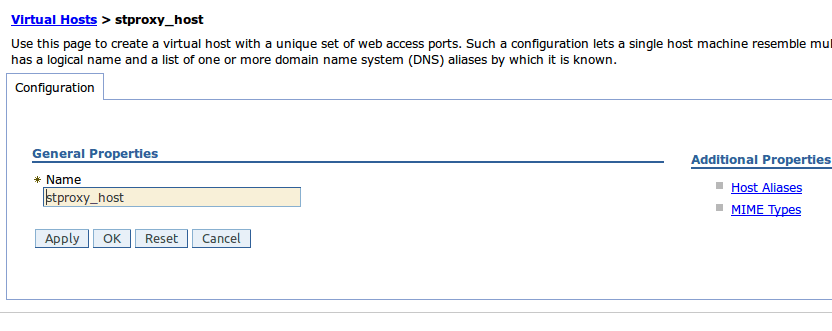
Enter the host aliases (under Additional Properties)
You need at least these 2 (the WC_defaulthost and WC_defaulthost_secure port entries in the STProxyServer). The actual values of the ports may be different in your case.
hostname default value example value (in my case) stproxy.tb.issc.ibm.com 9080 or 80 9081 stproxy.tb.issc.ibm.com 9443 or 443 9444
Save the changes.
Assign Virtual host to the Proxy Application
Assign the Virtual host to the SametimeProxy application (under Applications/All Applications).
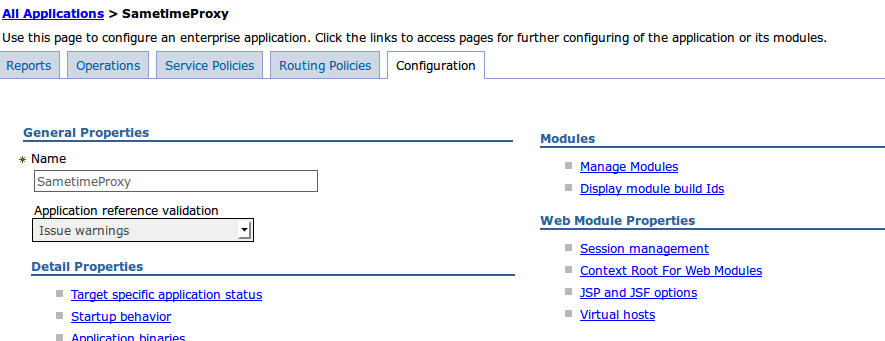
Under Web Module Properties, click “Virtual Hosts”
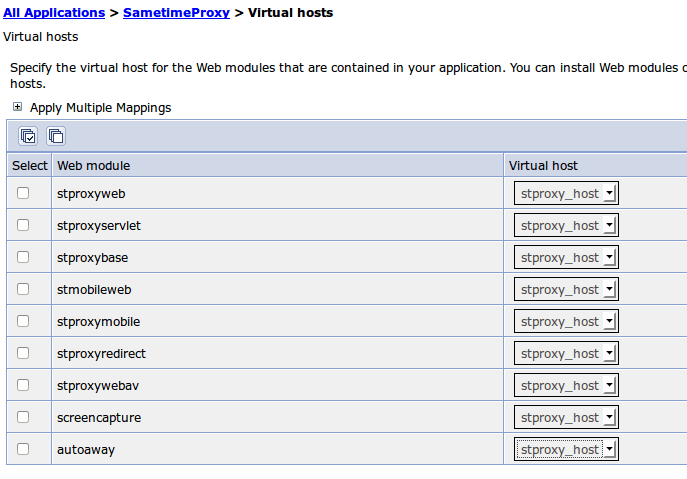
Change them all to the virtual host you just created.
Save the changes, sync the changes (or wait a bit).
Restart the Proxy server
JSESSIONID
To avoid SessionID conflicts if you use the same host for your Meeting Server and your Proxy server, you can change the name of the JSESSIONID cookies.
This is only necessary if you’re going to put a Reverse Proxy in front of the solution, that will create an accesspath with a single hostname to the environment (eg. WebSeal with transparent path junctions). This needs to be validated.
Go to the STProxy Server, select Session Management , click on “Enable Cookies” and rename the Cookie.
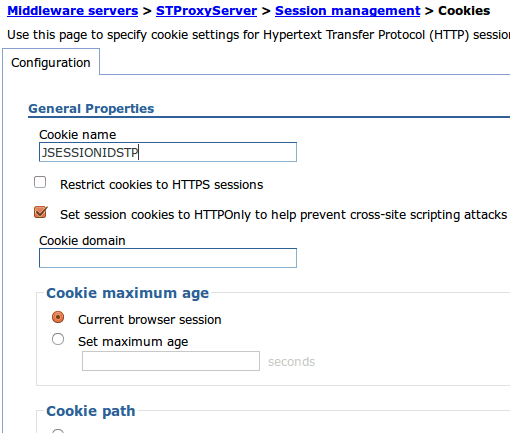
Save the change and restart the Proxy server (after the change syncs).