Using the WebSEAL jwt junction to an Open Liberty application in a Container
This is an overview of some of the options that exist in Open Liberty to consume jwt tokens generated by WebSEAL. It is largely based on the blog post by Shane Weeden (https://community.ibm.com/community/user/security/blogs/shane-weeden1/2016/11/11/isam-902-the-jwt-sts-module-and-junction-sso-to-we), but extended to use the newer capabilities of WebSEAL.
Adding a jwt token directly to a junction without using the AAC or Federation module, is new in IBM Security Verify Access 10
This means this has become a lot simpler.
I’ve added the configuration with the microProfile JWT feature, and added some very simple samples.
- Components
- Source Material
- Configuration for openidconnectclient feature
- Configuration for mpJwt feature
Components
Open Liberty
There’s several options in Open Liberty to enable the jwt authentication. I’ve explored 2 of them:
- openid Connect Client feature
- MicroProfile JWT feature (mpJwt)
openid Connect Client feature
This is the OpenLiberty feature originally used in Shane’s blog.
https://openliberty.io/docs/latest/reference/config/openidConnectClient.html
It’s suitable for traditional web applications, and likely easy to integrate in existing applications.
MicroProfile JWT version 1.2
MicroProfile enables you to develop and deploy cloud-native Java applications as loosely coupled, lightweight services, each representing one unique business function.
https://openliberty.io/docs/latest/microprofile.html
This obviously also makes perfect sense in Container environments, like the OpenShift platform.
Cookies … njam njam
Now there’s a difference in the way the 2 samples operate.
The MicroProfile is meant for web services, and there’s no JSESSIONID cookie created (it’s supposed to be stateless).
However, this implementation, using the WebSeal JWT junction does use the WebSEAL session cookie to create single sign on.
The openidconnectClient sample runs a traditional web application (servlet-5.0 feature), and as such there is a JSESSIONID cookie.
Depending on the configuration of the openidconnectClient feature, you can avoid that an LTPA Cookie is sent (see disableLtpaCookie)
Containers
Some notes on Containers : I’ve prepared 2 Open Liberty Containers that run the 2 cases (mpJwt and openidconnectClient).
Podman Container
You can run the containers for Open Liberty on any other platform and connect IBM Security Verify Access to them.
I’ve used Podman myself, but Docker works too. This would only be sufficient for a test setup, not a real production setup.
Redhat OpenShift
The Openshift configuration basically runs containers.
Please note that I’ve used a setup that creates junctions to OpenLiberty applications running on Containers (in addition to Podman I’ve also used the Redhat OpenShift Platform), but my IBM Security Verify Access system does not run on Containers/OpenShift (I’m still using virtual appliances).
This means the route into the applications has to go through an exposed route/ingress, not through internal services.
I’ve used Redhat Service Mesh (https://www.redhat.com/en/technologies/cloud-computing/openshift/what-is-openshift-service-mesh) myself. There’s some additional configuration related to this Service Mesh required (although this depends on how you configure the Service Mesh). Using standard routes will work too, though. But with normal routes, you are almost obliged to use Virtual Host junctions, while with the Service Mesh, transparent path junctions can match the configuration.
I’m not actually going into the application configuration details here.
TIP: What is likely necessary (depending on the configuration of the service mesh), is setting the “Server Name Indicator (SNI)” value when you create a junction.
WebSEAL
IBM Application Gateway
This is a good time to mention the IAG. This is a container with a lightweight reverse proxy.
The microProfile matches very nicely with the IBM Application Gateway.
https://docs.verify.ibm.com/verify/docs/use-ibm-application-gateway-with-ibm-security-verify-access
This lightweight reverse proxy has a similar capability to send a jwt token to backend (resource) servers.
https://docs.verify.ibm.com/gateway/docs/yaml-resource_servers-identity_headers#jwt
WebSeal jwt SSO junction
But the WebSeal solution still makes sense today. The WebSeal jwt SSO junction allows simple (session based) single sign on between your Single Page Application and the REST services running in microProfile microservices.
This is a Cookie-based session (based on the WebSeal Cookie being passed to the junctions that protect your microservices).
So on the IBM Verify Access Appliance, the big improvement is that you can generate a jwt token directly on WebSEAL, without needing the Federation nor Advanced Access Control module. It behaves more or less similar to the older LTPA single signon type : a token (cookie or header) is inserted with every request to the backend.
It’s available since version 10.0.0, but improves in later fixpacks. My setup is based on IBM Security Verify Access 10.0.4.
https://www.ibm.com/docs/en/sva/10.0.4?topic=solutions-json-web-tokens-in-http-headers
The solution using Federation and STS chains is still valid and it really depends on your use case if you can use this newer solution or not.
As long as you are able to put the claims you want to put in the jwt token in the WebSeal credential (see the credential viewer app), you’re good.
This write-up just puts fixed text in some of the claims, which is fine for testing, but obviously not (always) in a real-world scenario.
If you want to use JKE (encrypted jwt), you’ll also have to use the Federation / STS chains solution. The JWT tokens generated by WebSeal can be signed, but not encrypted at present.
Source material
The source material is available through github:
https://github.com/Bozzie4/isam-liberty-jwt
So to clone this repository:
cd <directory_of_your_choice>
git clone https://github.com/Bozzie4/isam-liberty-jwt.git
cd isam-liberty-jwt
Configuration for Liberty with openidConnectClient feature
I’m using the exact same SubjectDumperEAR.ear application that I got from Shane’s blog :
Container
#THIS IS THE LIGHT IMAGE BASED ON UBUNTU
# There is also an image based on ubi
FROM docker.io/library/open-liberty:kernel-slim-java17-openj9

ARG NAME=openidtest
ARG VERSION=v1.0.0

ENV TZ=Europe/Brussels \
	APP_NAME="$NAME"

LABEL \
	org.opencontainers.image.authors="Tom Bosmans" \
	org.opencontainers.image.vendor="Open Liberty" \
	org.opencontainers.image.url="" \
	org.opencontainers.image.source="" \
	org.opencontainers.image.version="$VERSION" \
	vendor="Open Liberty" \
	name="$NAME" \
	version="$VERSION" \
	summary="$NAME" \
	description="Open Liberty runtime with $NAME."

USER root

#==========================
# Add trusted certificates on Ubuntu - must be named *.crt !!!
#========================
ADD ["isam.crt", \
	"/usr/local/share/ca-certificates/"]
# Run update for ca trust - f0cabfe5.0
RUN update-ca-certificates --verbose

#USER 1001
USER default
#
# Default adding cert_defaultKeyStore
#     You can overwrite these in Podman, Docker or OpenShift
ENV cert_defaultKeyStore=/etc/ssl/certs/ca-certificates.crt

COPY --chown=1001:0 /src/main/liberty/config /config

RUN features.sh

COPY --chown=1001:0 ear/*.ear /config/dropins

RUN configure.sh
Build
The application is supplied as an .ear file.
You can build and run the container:
cd openidconnectclient/
podman build -t openidconnectclient:v1.0.0 .
podman run -d --replace --name openidtest -p 9081:9081 --add-host isam.tombosmans.eu:10.168.73.248 openidconnectclient:v1.0.0
The --add-host parameter adds an entry to the Container’s /etc/hosts file, to enable the connnection from the Open Liberty server to the jwks endpoint.
Open Liberty
Add feature
Add the openidConnectClient feature to the server.xml:
  <featureManager>
    <feature>openidConnectClient-1.0</feature>
    <feature>servlet-5.0</feature>
  </featureManager>
Enable the ports
  <httpEndpoint id="defaultHttpEndpoint"
    host="*"
    httpPort="9080"
    httpsPort="9443" />
Configure the openidConnectClient feature
Configure the openidConnectClient feature:
The important items here are
- inboundPropagation set to required, to enable (or rather force) jwt authentication
- issuerIdentifier: the
issclaim, must match the jwt WebSeal configuration - jwkEndpointUrl: the jwks endpoint (points to WebSeal’s jwks app)
- headerName: the openidConnectClient allows to use a custom headerName, in this case : jwt
- realmName: passes the realm name to this traditional ear application.
<openidConnectClient
 id="TBJWT"
 inboundPropagation="required"
 issuerIdentifier="https://issuer"
 audiences="ALL_AUDIENCES"
 signatureAlgorithm="RS256"
 jwkEndpointUrl="https://isam.tombosmans.eu:444/jwks.json"
 realmName="defaultRealm"
 groupIdentifier="groups"
 headerName="jwt"
 mapIdentityToRegistryUser="false"
 accessTokenCacheEnabled="true"
 accessTokenCacheTimeout="10s"
 tokenReuse="true"
 disableLtpaCookie="true"
/>
Note that disableLtpaCookie is set to true here.
This means that Open Liberty is NOT going to generate an LTPA Cookie.
It is therefor important to make sure the generated jwt tokens can be reused for a particular amount of time - otherwise each request will contain a new jwt token and that would have to be parsed and processed every time.
That is why I’ve set the accessTokenCache* and tokenReuse properties (although 10s is way too low for real life usefulness).
Open Liberty Trust certificates
The signer CA certificate to access the jwkEndpointUrl MUST be in the default trust store, the default trust store (if not configured otherwise) is the same as the default key store : defaultKeyStore.
To add signer certificates at runtime (when Open Liberty starts) automatically, you need to create an environment variable that is named cert_<name of keystore>, so in this case : cert_defaultKeyStore.
In Linux (for instance, to run the development environment using maven), this looks like this:
export cert_defaultKeyStore=<full_path_to_ca_file>
WebSeal
Junction
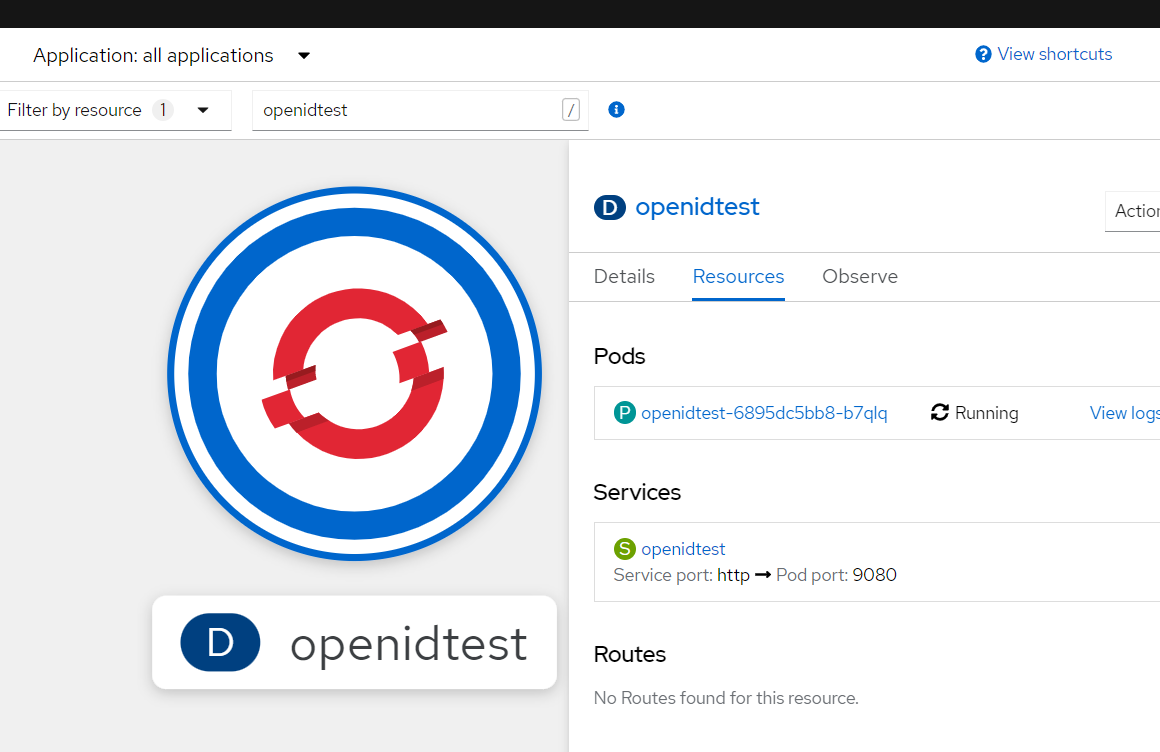
This is a normal, standard junction to reach the Liberty server.
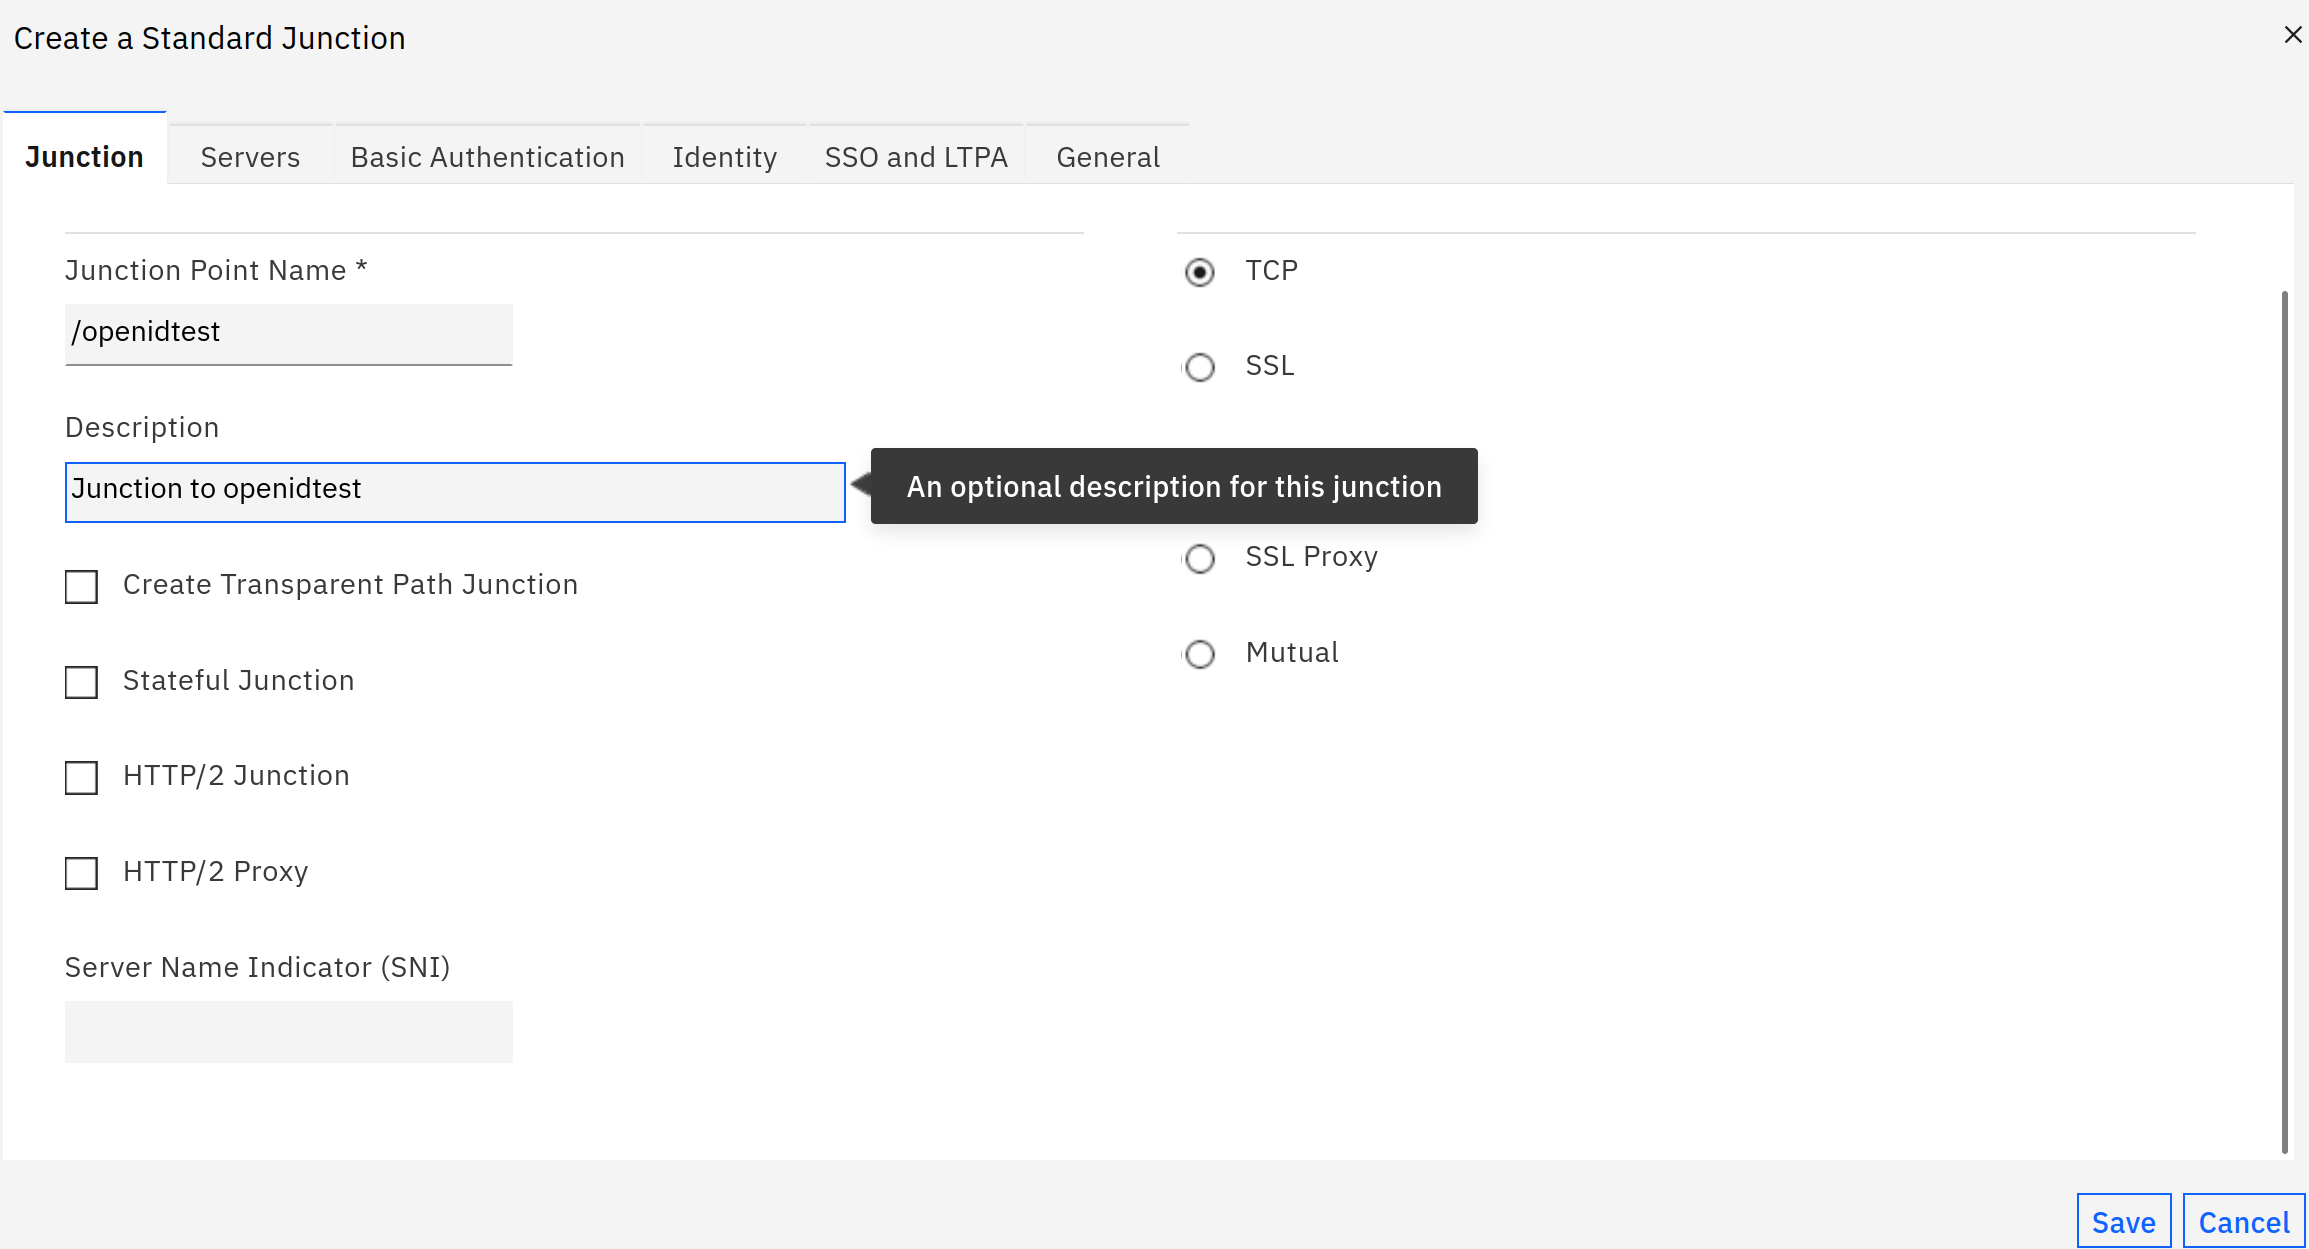
The server configuration connects to the non-ssl port of the Open Liberty container, in this case 9080.
jwt configuration
Add the following to WebSeal’s configuration file.
[jwt:/openidtest]
key-label = jwtsign
claim = text::https://issuer::iss
claim = attr::AZN_CRED_PRINCIPAL_NAME::sub
claim = attr::AZN_CRED_PRINCIPAL_NAME::upn
claim = attr::AZN_*
claim = text::[Echoer]::roles
claim = text::[groupa,groupb]::groups
include-empty-claims = false
hdr-name = jwt
hdr-format = %TOKEN%
lifetime = 0
renewal-window = 15
The lifetime set to 0 means the jwt token will remain valid for the duration of the WebSeal session.
This avoids that WebSeal would need to generate a new jwt token on (almost) every request (which would possibly have a negative performance impact).
Anyway, whatever you do, don’t set the lifetime to a value lower than the renewal-window.
The actual lifetime is calculated as lifetime minus renewal-window…
jwks endpoint
Using the local-apps stanza, you can add the jwks application , that will create a jwks endpoint based on the SSL keystore that is assigned to the Reverse Proxy.
I also enable the cred-viewer application, because it’s a convenient way to see what’s in the credential.
[local-apps]
jwks = jwks.json
cred-viewer = credviewer
You must assign an unauthenticated ACL to this endpoint, so it’s publicly available.
Test application
So now we’ve prepared all elements (assuming you have a reverse proxy already on WebSeal and you have a test user).
dumpHeaders.jsp
I’ve added an unauthenticated ACL to the /openidtest/dumpHeaders.jsp Object in pdadmin.
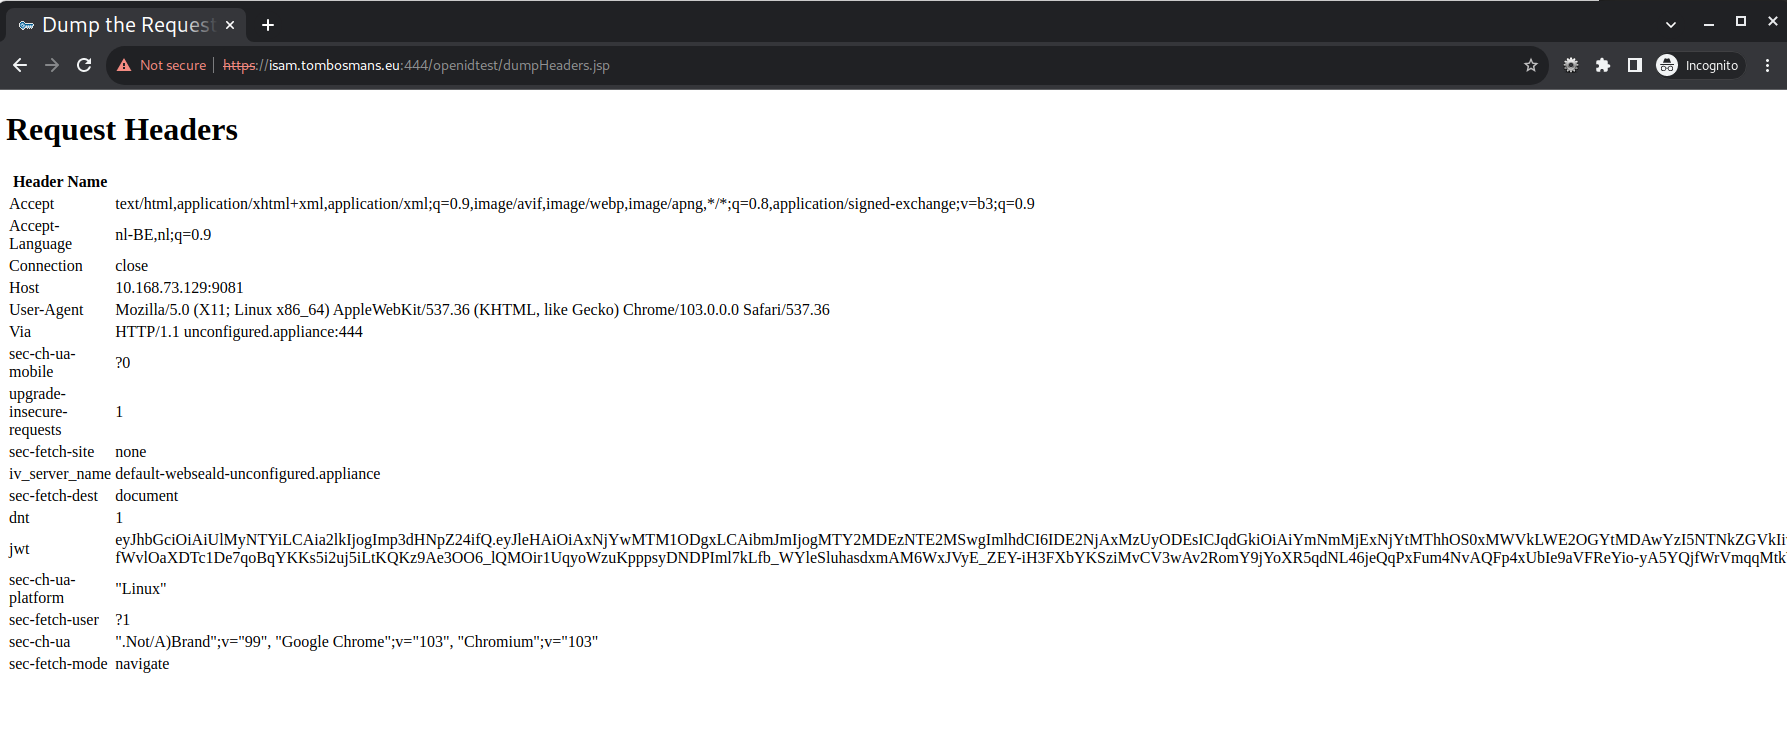
Note: Accessing this endpoint with an authenticated session on WebSeal, throws this error in Open Liberty. I have not attempted to fix this.
E checkSecurity SESN0008E: A user authenticated as anonymous has attempted to access a session owned by user:defaultRealm/tommie
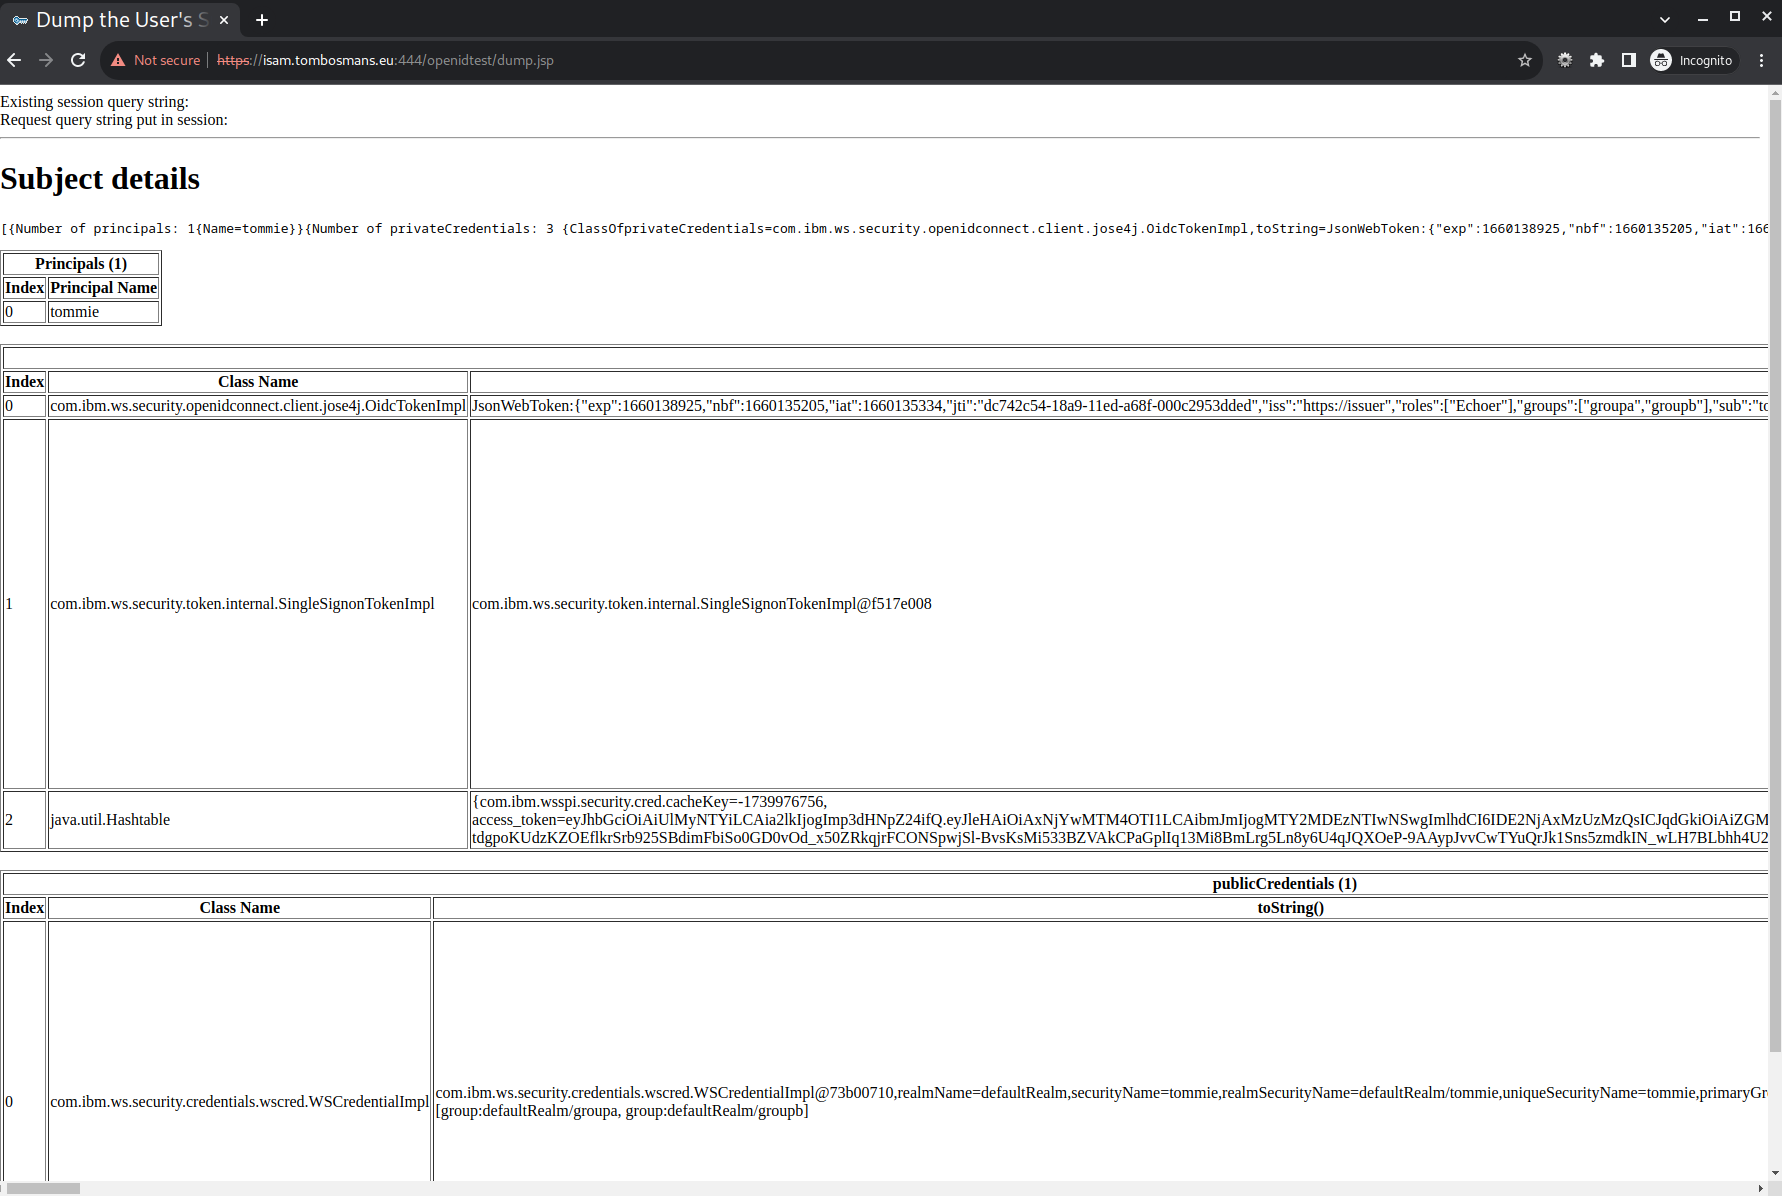
dump.jsp
Accessing https://your-isam-system/openidtest/dump.jsp, requires you to log on. After you log in, it dumps the content of the jwt token sent by WebSEAL, and informatio on the authenticated user.
whoami.jsp
Accessing https://your-isam-system/openidtest/whoami.jsp, equally requires you to log on. It dumps the content a summary the user data:
rolea/whoami.jsp
The resources that are only accessible for users in “role A”, are also accessible, because we put “groupa” in the groups claim in the jwt token:
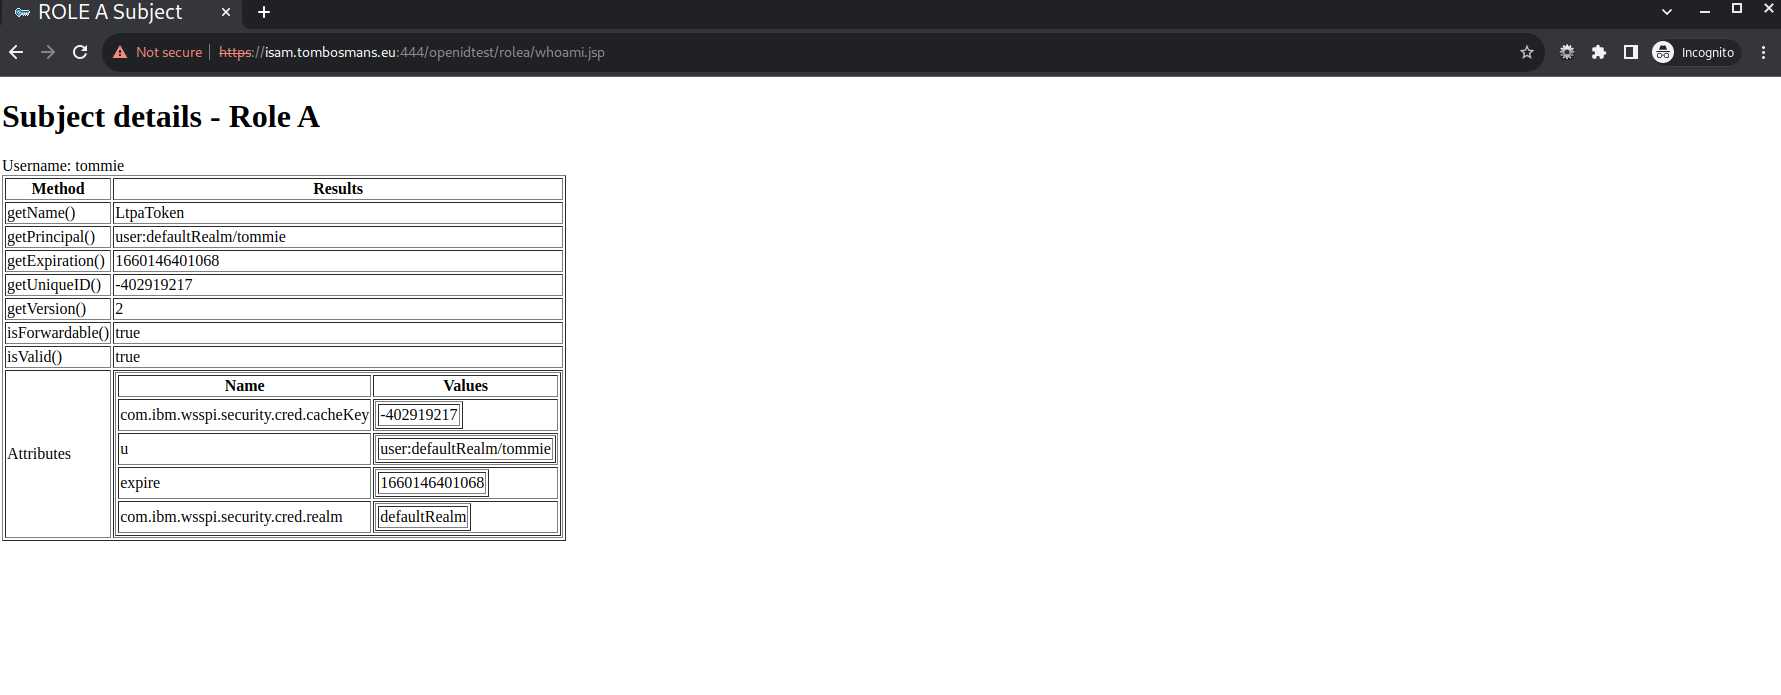
Note that there is NO LtpaToken in this case (see the server.xml configuration).
Configuration for mpJwt
I’ve used this “Securing microservices with JSON Web Tokens” guide and added the creating of a Container image (for running locally with Podman or Docker, or OpenShift).
I’ve also modified the application a bit so it works with microProfile 5.0 , and I’ve added a couple of the custom Claims.
https://github.com/OpenLiberty/guide-microprofile-jwt
Podman/Docker
Container file
This is a sample container file that you can use.
Notice the isam.pem CA file; that is the public key for the self-signed certificate I’m using in my ISAM Virtual machine. Of course you would need to use your own self-signed file here.
It is important here, because OpenLiberty needs the CA trusts to connect to ssl endpoints and specifically the jwks endpoint.
By adding environment variables named for the keystores in Liberty (eg cert_defaultKeyStore), these public keys can be added at runtime.
#THIS IS THE LIGHT IMAGE, BUT THEN WE DON'T HAVE FEATURES (Ubuntu based)
FROM docker.io/library/open-liberty:kernel-slim-java17-openj9

LABEL \
  org.opencontainers.image.authors="Tom Bosmans" \
  org.opencontainers.image.vendor="IBM" \
  org.opencontainers.image.url="local" \
  org.opencontainers.image.source="https://github.com/OpenLiberty/guide-getting-started" \
  org.opencontainers.image.version="$VERSION" \
  org.opencontainers.image.revision="$REVISION" \
  vendor="Open Liberty" \
  name="system" \
  version="$VERSION-$REVISION" \
  summary="The mp-jwt-sample-app" \
  description="This image contains the system microservice running with the Open Liberty runtime."

ENV TZ=Europe/Brussels
#
#  Add signer cert for isam f0cabfe5.0
#   must be named xxx.crt to work in ubuntu
#
COPY isam.crt /usr/local/share/ca-certificates/

USER root
# Run update for ca trust
RUN update-ca-certificates --verbose

USER default
#
# Default adding cert_defaultKeyStore
#       You can overwrite these in Podman, Docker or OpenShift
ENV cert_defaultKeyStore=/etc/ssl/certs/ca-certificates.crt

COPY --chown=default:0 /src/main/liberty/config /config

#-> this does not work if you don't have internet access
# You may want to use a different liberty image in that case
RUN features.sh

COPY --chown=default:0 target/*.war /config/apps

RUN configure.sh
The default user has id 1001.
Note that you don’t really need to put the cert_defaultKeyStore environment variable in the Container image, you can also add this at runtime .
For example, to add the environment variable cert_defaultKeyStore using Podman, use --env :
podman run -d --replace --name mpjwtpublic -p 9081:9081 --add-host isam.tombosmans.eu:10.20.30.40
 --env 'cert_defaultKeyStore=/etc/ssl/certs/ca-certificates.crt'
 mpjwtpublic:v1.0.0
Build
To build the application, and package it in a Container, you need to first package the application (using Maven):
cd <your-directory>/isam-liberty-jwt/mpJwt_demo
mvn package
Then you can build and run the Container:
podman build -t mpjwtpublic:v1.0.0 .
podman run -d --replace --name mpjwtpublic -p 9080:9080 -p 9443:9443 --add-host isam.tombosmans.eu:10.168.73.248 mpjwtpublic:v1.0.0
Note the --add-host to add an entry to the container’s /etc/hosts file, for the jwksUri resolution further down. This is entirely optional and obviously not necessary if your dns is working correctly.
To make the container publicly available (for instance, to deploy to OpenShift), you can publish the container to a repository of your choice (eg. quay.io or a private repository):
podman login <repo>
podman push <repo>/mpjwtpublic:v1.0.0
Liberty
Server.xml
Add the feature microProfile-5.0 feature:
<featureManager>
    <feature>microProfile-5.0</feature>
</featureManager>
It contains a bunch of stuff, among which mpJwt-2.0.
Enable the ports
<httpEndpoint id="defaultHttpEndpoint"
  host="*"
  httpPort="9080"
  httpsPort="9443" />
Configure the mpJwt feature
In older version of the mpJwt feature, you needed to configure it in the microprofile-config.properties file in the webapp itself.
Today, all of the configuration can be done in the server.xml directly (if you’d like).
Some of the configuration is exclusively available in the server.xml, by the way. The jwksUri is not an option in the microprofile-config.properties.
This is a very simple configuration:
<mpJwt id="testJWT"
  issuer="https://issuer"
  jwksUri="https://isam.tombosmans.eu:444/jwks.json"
  tokenHeader="Authorization"
  userNameAttribute="sub"
/>
- jwksUri: this points to the jwks endpoint on WebSeal
- issuer: the issuer needs to match the
issclaim - userNameAttribute: changes the default
upnof the mpJwt profile to the default in oidcsub
WebSeal
General configuration
I’ve just added a user the local repository , so I’m able to login.
Junction
This junction is a transparent path junction to the “/api” application.
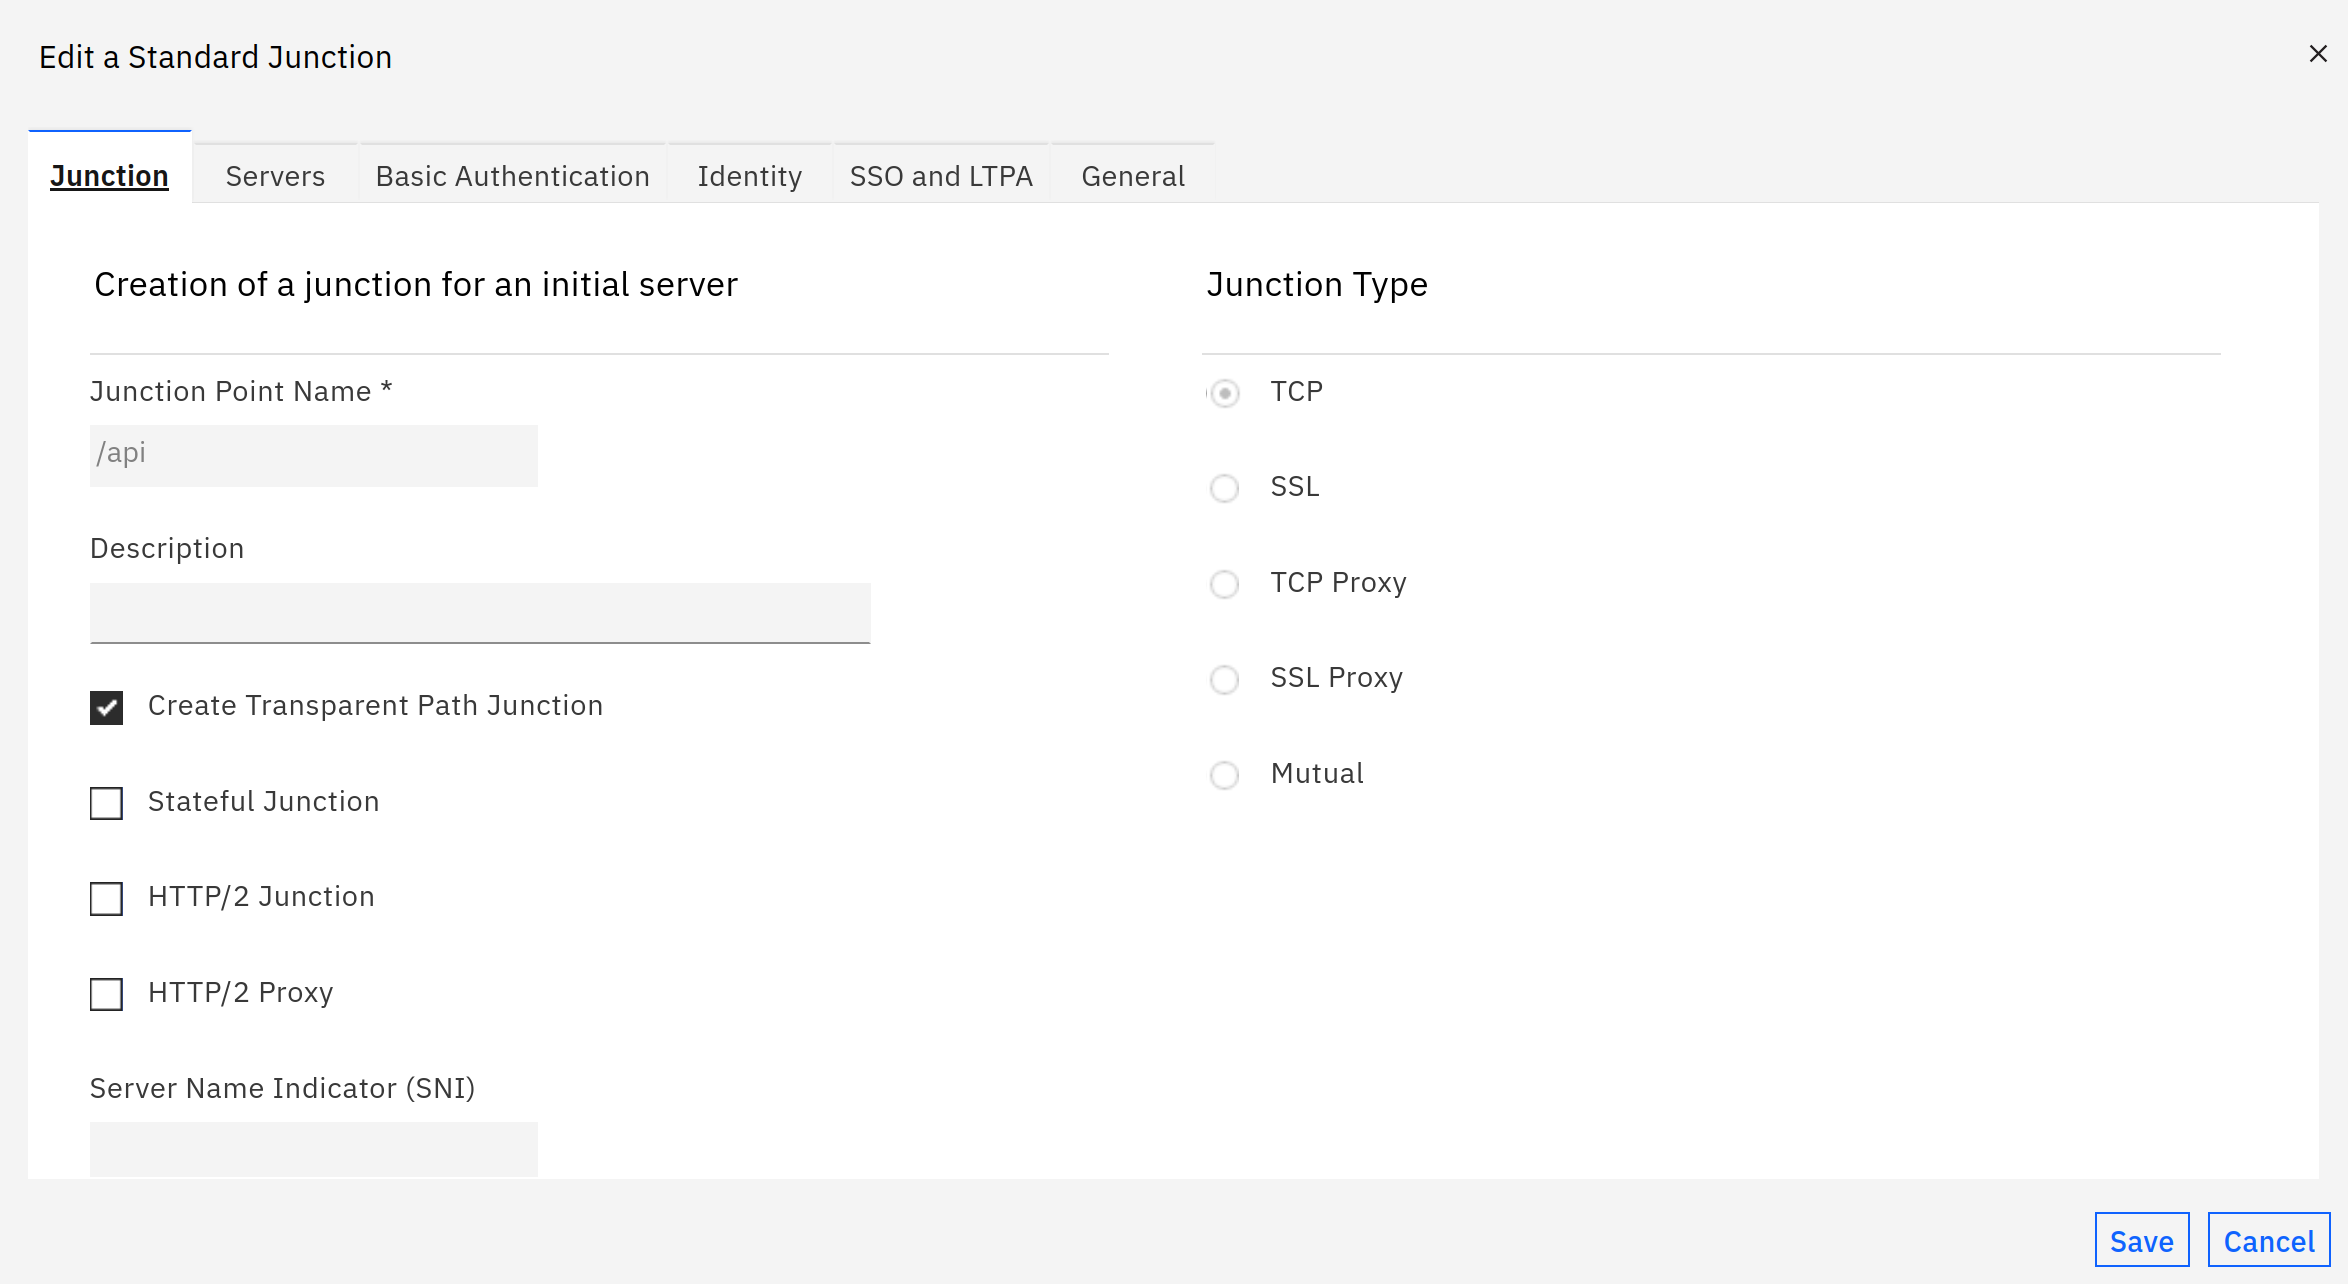
The server to connect to, obviously depends on your backend. Here, this is a local Podman installation, connecting on the http port.
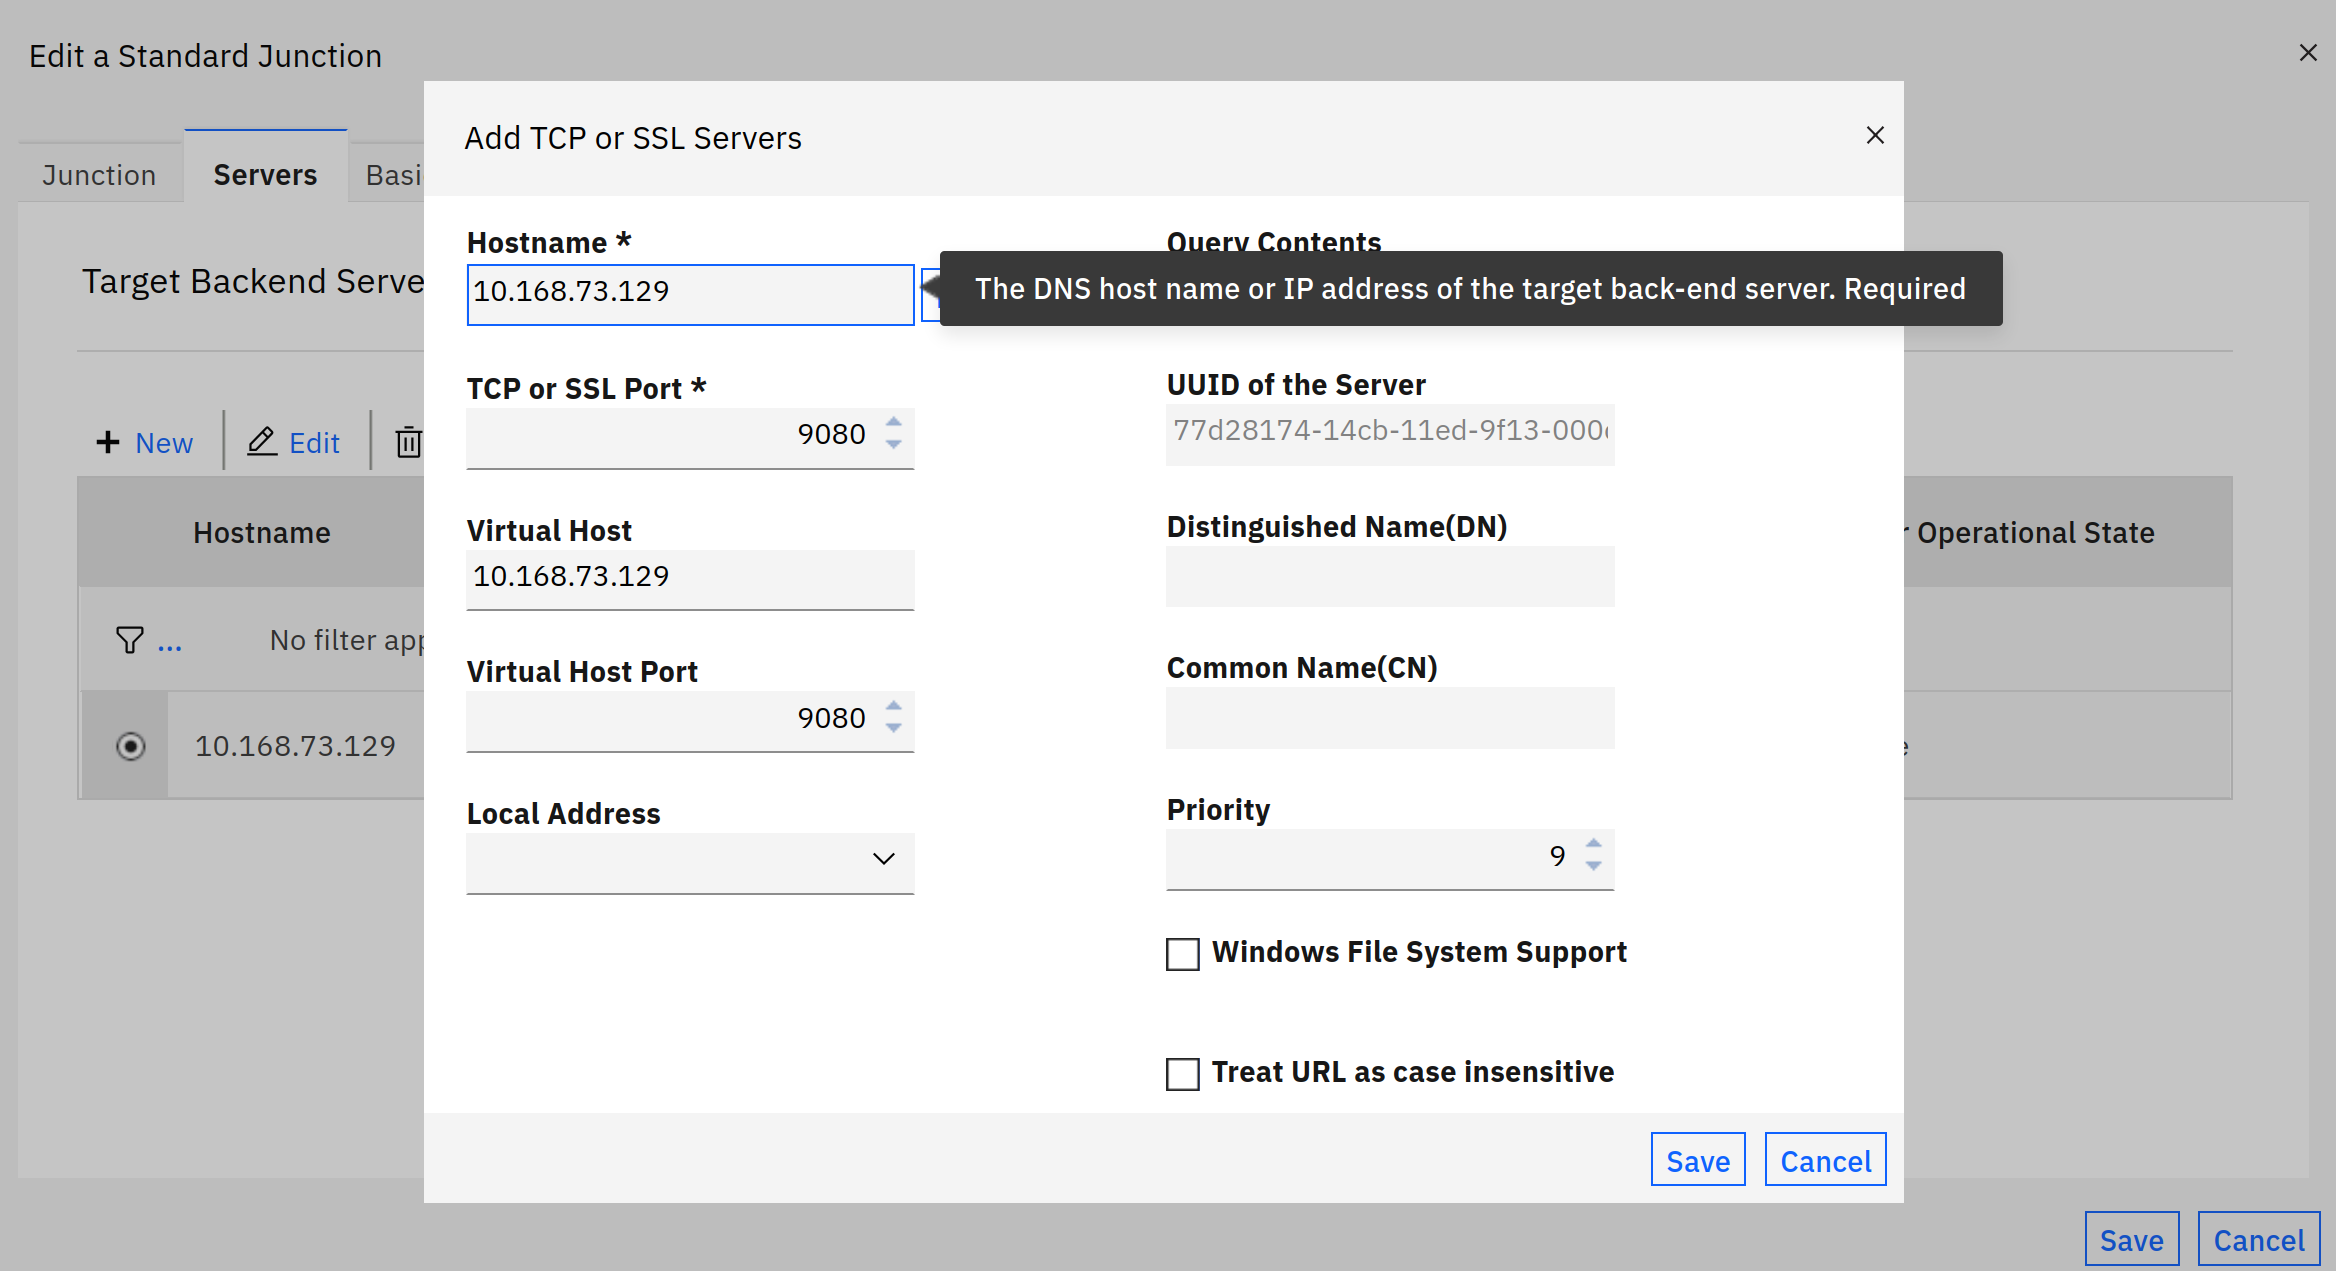
With OpenShift, this would the Route url to your application, or the url for the Ingress you’ve configured (for instance, Istio Service Mesh).
jwt configuration
This goes in the webseald.conf for the reverse proxy
[jwt:/api]
key-label = jwtsign
claim = text::https://issuer::iss
claim = attr::AZN_CRED_PRINCIPAL_NAME::sub
claim = attr::AZN_CRED_PRINCIPAL_NAME::upn
claim = attr::AZN_*
claim = text::[Echoer]::roles
claim = text::[Echoer,Tester,group1,group2]::groups
include-empty-claims = false
hdr-name = Authorization
hdr-format = Bearer %TOKEN%
lifetime = 0
The groups claim needs to contain the roles that can be used with the @RolesAllowed annotation.
Notice the syntax, you must enclose multiple values in square brackets.
jwks endpoint
The same jwks application is enabled as for the openidconnectclient configuration.
Note that I use the same certificate (jwtsign) in both cases.
Test application
RolesEndpoint
This endpoint is directly taken from the original sample and merely updated to work with microProfile 5.0.
ClaimsEndpoint
This piece of code includes 2 ways to retrieve Claim values:
- through Injection of the JsonWebToken, which allows access to the raw jwt token as well as the claims
- through Injection of the individual Claims. Examples below are of a standard jwt claim (“iss”), and of a custom claim (“AZN_CRED_BROWSER_INFO”), added by WebSeal’s jwt junction.
The user needs to be part of the Echoers role to access the /api/claims url (this is accomplished by the groups claim added in WebSeal’s jwt configuration)
package dev.microprofile.jwt;

import java.security.Principal;

import jakarta.annotation.security.RolesAllowed;
import jakarta.enterprise.context.RequestScoped;
import jakarta.enterprise.context.ApplicationScoped;
import jakarta.ws.rs.GET;
import jakarta.ws.rs.Path;
import jakarta.ws.rs.QueryParam;
import jakarta.ws.rs.core.Context;
import jakarta.ws.rs.core.SecurityContext;

// CLAIM
import jakarta.inject.Inject;
import org.eclipse.microprofile.jwt.*;
import jakarta.json.JsonArray;

@RequestScoped
@Path("claims")
public class ClaimsEndpoint {
    @Inject
    private JsonWebToken callerPrincipal;

    @Inject
    @Claim("iss")
    private String issuer;

    @Inject
    @Claim("AZN_CRED_BROWSER_INFO")
    private String claimBrowserInfo;

    @Inject
    @Claim("AZN_CRED_REGISTRY_ID")
    private String claimRegistryId;

    @GET
    @Path("test")

    public String getTest() {
        return "issuer: " + issuer + "\n<br/>browser:" + claimBrowserInfo + "\n<br/>registry id:" + claimRegistryId;
    }
    @GET
    @RolesAllowed("Echoer")

    public String echoInput(@Context SecurityContext sec, @QueryParam("input") String input) {
        Principal user = sec.getUserPrincipal();
        System.out.println("Issuer " + issuer);
        if (callerPrincipal == null) {
          return "user="+user.getName();
        }
        return "user="+user.getName() + "\n" + callerPrincipal.getRawToken() + "\n<br/>claim: " + callerPrincipal.getClaim("AZN_CRED_PRINCIPAL_UUID");
    }
}
Login to WebSeal
So to access the url’s, you’ll have to login to ISAM first.
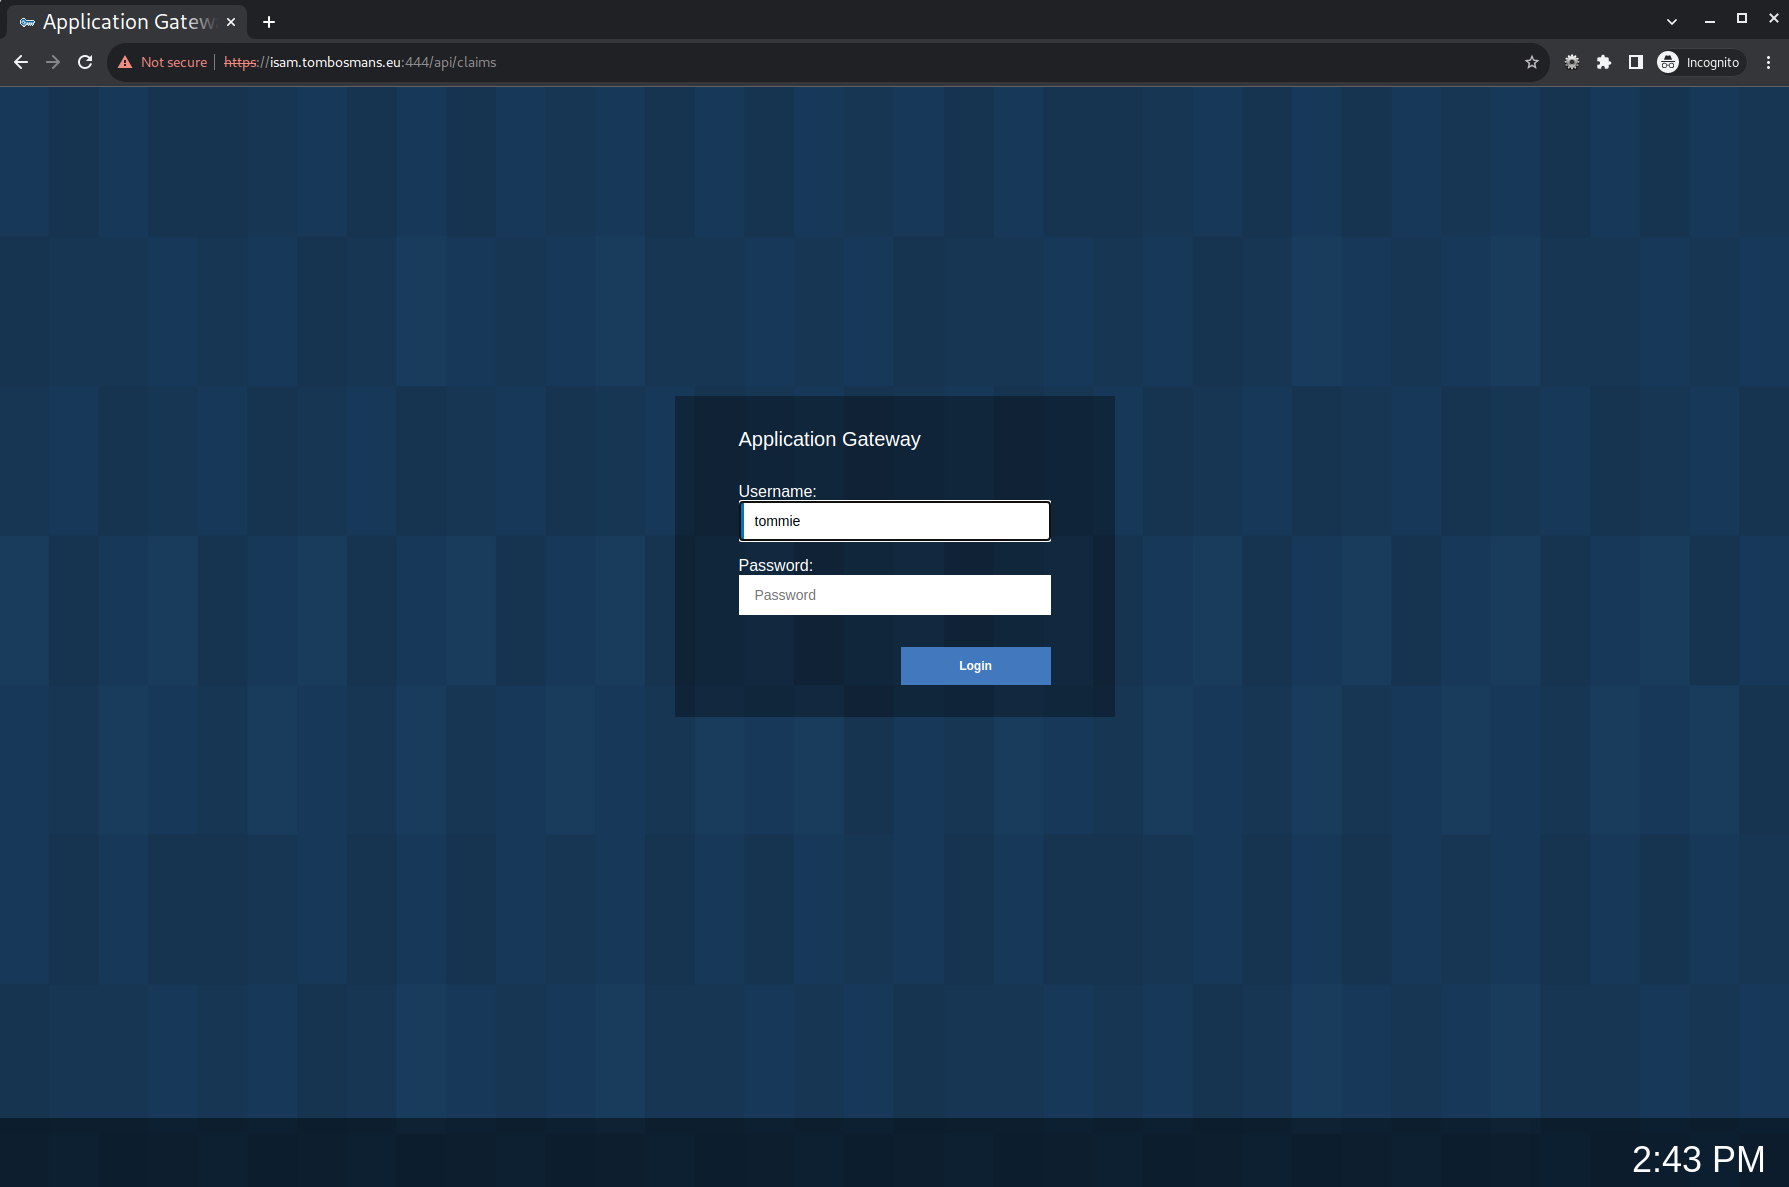
/api/claims
Then you can access the endpoints.
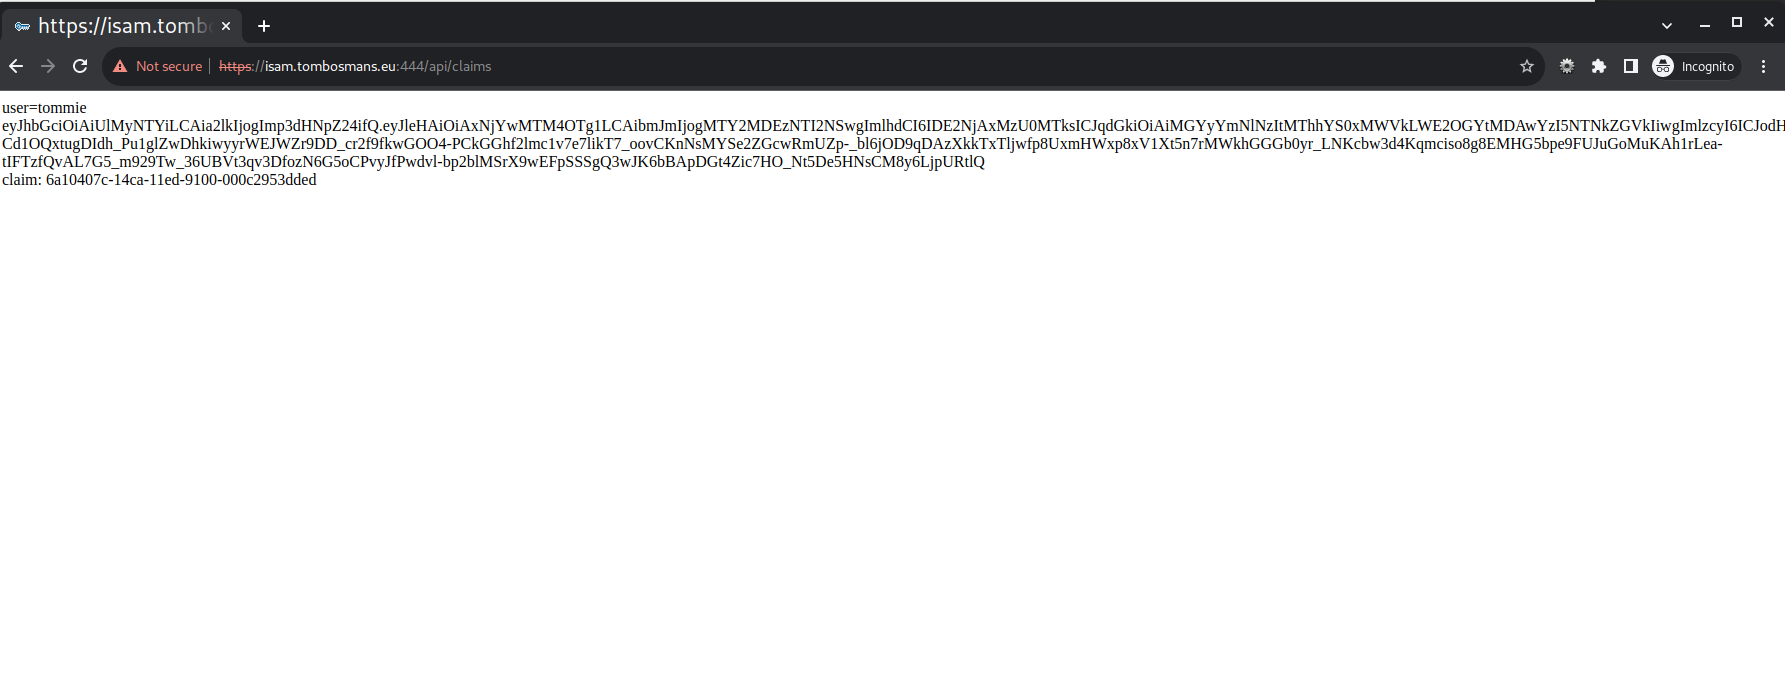
Notice the full jwt claim displayed (from the JsonWebToken object), as well as the issuer value and the value of the AZN_CRED_PRINCIPAL_UUID
WebSeal claim, added by .getClaim().
/api/claims/test
This endpoint uses the @Claim(“AZN_CRED_BROWSER_INFO”) Annotation to access the claim info.

Open Liberty
To enable tracing of the jwt consumption process on Liberty, you can add this to the server.xml.
<logging traceSpecification="*=audit:com.ibm.ws.security.jwt.*=finer"/>
You can also enable this at runtime by creating a file at /config/configDropins/overrides/tracing.xml
<server>
<logging traceSpecification="*=audit:com.ibm.ws.security.jwt.*=finer"/>
</server>
Maven
To run the samples locally, you need Maven installed. Maven allows you to run in development mode, so changes to code or configuration are immediately visible.
This is all pretty easy and explained on the Open Liberty website.
Additional Links
- https://openliberty.io/blog/2021/03/26/MP-JWT-1.2.html
- https://openliberty.io/docs/latest/reference/feature/mpJwt-2.0.html
- https://openliberty.io/docs/latest/reference/config/mpJwt.html
- https://download.eclipse.org/microprofile/microprofile-jwt-auth-1.2/microprofile-jwt-auth-spec-1.2.html#_additional_claims
- https://openliberty.io/blog/2019/12/06/microprofile-32-health-metrics-190012.html#ssl