Letsencrypt certificates for my own test servers
Yes, it’s a bit over the top to use Let’s Encrypt certificates for test systems, where a self-signed certificate would serve a similar purpose. Furthermore, a Let’s Encrypt certificate has a short lifetime and needs to be replaced every 3 months.
But since Let’s Encrypt brought wild-card certificates to us fairly recently (march 2018), there is an advantage here.
You only need this single certificate and you can use it on all your systems.
Of course, in most case you don’t want to use wild-card certificates, but for my case (non-production test systems) , this is perfectly valid.
https://community.letsencrypt.org/t/acme-v2-and-wildcard-certificate-support-is-live/55579
To use wildcard certificates, you must use the DNS challenge (instead of the more traditional https challenge that Let’s encrypt uses for verify ). The mechanism that is used, is similar to other verification mechanisms like DKIM for smtp (see DKIM deployed on my mailservers )
My usecase here is a test environment running ISAM - IBM Security Access Manager https://www.ibm.com/us-en/marketplace/access-management. Not having to trust the signer each time I access a page with a self-signed certificate , is a huge plus when demoing a solution :-)
1. Prerequisites
- You need a recent version of certbot (that has the support for dns challenge, and the support for ACMEv2) , I’m using certbot 0.24.0
- This certbot needs to run on a system with Internet access (outbound only, it needs to connect to the letsencrypt systems)
- You also need a public dns domain, because Let’s Encrypt uses DNS for the verification. The only thing that needs to be in the domain records, is a TXT record btw. You don’t need to configure anything else.
2. DNS Preparation
I ordered a dns domain from my prefered DNS provider (https://login.domaindiscount24.com/) .
I could get a EU domain for something like 3 Euro for the first year .
There is nothing to configure for now , the configuration is done during the certbot action.
3. Certbot
Run certbot with the option --preferred-challenges dns, and define your domain as *.. (mine is *.tombosmans.eu).
You can also use certbot-auto, and you can use a single commandline here, but I used this method :
[root@system ~\]# certbot certonly --manual --server https://acme-v02.api.letsencrypt.org/directory --preferred-challenges dns
Saving debug log to /var/log/letsencrypt/letsencrypt.log
Plugins selected: Authenticator manual, Installer None
Starting new HTTPS connection (1): acme-v02.api.letsencrypt.org
Please enter in your domain name(s) (comma and/or space separated) (Enter 'c'
to cancel): *.tombosmans.eu
Obtaining a new certificate
Performing the following challenges:**
dns-01 challenge for tombosmans.eu**

-------------------------------------------------------------------------------
NOTE: The IP of this machine will be publicly logged as having requested this
certificate. If you're running certbot in manual mode on a machine that is not
your server, please ensure you're okay with that.

Are you OK with your IP being logged?
-------------------------------------------------------------------------------
(Y)es/(N)o: Y

-------------------------------------------------------------------------------
Please deploy a DNS TXT record under the name
_acme-challenge.tombosmans.eu with the following value:

9zE0cU5V1hiYo5HJWY-Zx6FW74gl1gd5P9dnS0G8cYw

Before continuing, verify the record is deployed.
-------------------------------------------------------------------------------
Press Enter to Continue
So now you need to go to your DNS provider, and create a TXT DNS record for _acme-challenge.domain, in my case, _acme-challenge.tombosmans.eu
_acme-challenge 28800 IN TXT 9zE0cU5V1hiYo5HJWY-Zx6FW74gl1gd5P9dnS0G8cYw
In the interface of my DNS provider, it looks like this : I need to create a new subdomain, named _acme-challenge.tombosmans.eu .

In the next step , I can then enter the value that certbot provided , in a TXT field.
Now once you saved your DNS entry, DO NOT continue immediately.
Give it at least 1 minute, so you’re certain the DNS entry is available, or even better, verify that your nameserver is up-to-date by performing a dns lookup, for instance using dig .
In my case, I can use this command, to use the nameserver of my provider. Do this on another system you have your certbot command running, or open a new session .
dig -t txt +short @ns1.domaindiscount24.net _acme-challenge.tombosmans.eu
"9zE0cU5V1hiYo5HJWY-Zx6FW74gl1gd5P9dnS0G8cYw"
It needs to return the value of the TXT record. As long as it doesn’t, DO NOT continue in the certbot session, because it will fail and you need to start over.
But if it does return the key, continue.
Waiting for verification...
Cleaning up challenges

IMPORTANT NOTES:
- Congratulations! Your certificate and chain have been saved at:
/etc/letsencrypt/live/tombosmans.eu/fullchain.pem
Your key file has been saved at:
/etc/letsencrypt/live/tombosmans.eu/privkey.pem
Your cert will expire on 2018-09-24. To obtain a new or tweaked
version of this certificate in the future, simply run certbot
again. To non-interactively renew *all* of your certificates, run
"certbot renew"
- If you like Certbot, please consider supporting our work by:
Donating to ISRG / Let's Encrypt: https://letsencrypt.org/donate
Donating to EFF: https://eff.org/donate-le
Now the chain and certificate files are in the standard Let’s Encrypt locations described (/etc/letsencrypt/live/./).
Since this is a wildcard certificate, you likely want to copy it elsewhere and distribute across your systems.
4. Let’s Encrypt keys and ISAM
IBM Security Access Manager expects pkcs12 certificates , so we first need to use openssl to convert the letsencrypt certificates to a .p12 .
I’m using ISAM 9.0.5, as OVA .
openssl pkcs12 -export -out tombosmans.eu.p12 \\
\-inkey /etc/letsencrypt/live/tombosmans.eu/privkey.pem \\
\-in /etc/letsencrypt/live/tombosmans.eu/cert.pem \\
\-certfile /etc/letsencrypt/live/tombosmans.eu/chain.pem

Enter Export Password:
Verifying - Enter Export Password:
Use a strong password to protect your key !
( https://community.letsencrypt.org/t/combining-key-and-certificate-into-a-pkcs12-file/21113/3 )
Now get the certificate to a system where you can upload it to ISAM .
In the LMI, I want it in 2 places :
- the management certificate
- the default certificate for the reverse proxies
hosts file on ISAM
Add the ip addresses for the interfaces you want to use in the hosts file on ISAM. We could use DNS as well (since we have the public dns domain), but since this is internal, I am not going to do that and use simple hosts files .
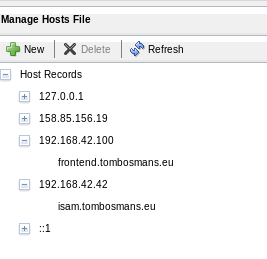
Also, I use the following hosts file on my local machine to access my environment (which is a bit silly, since I have a dns server):
192.168.42.42 isam.tombosmans.eu
192.168.42.100 frontend.tombosmans.eu
management certificate
Go to Manage System Settings/System Settings/Management SSL Certificate
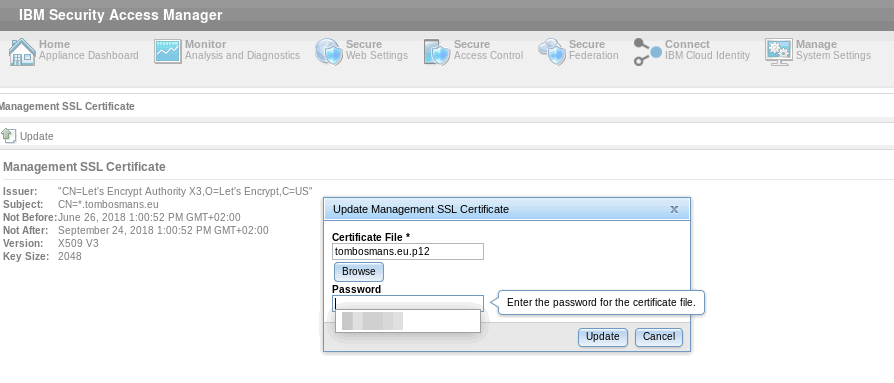
The LMI will be restarted after this.
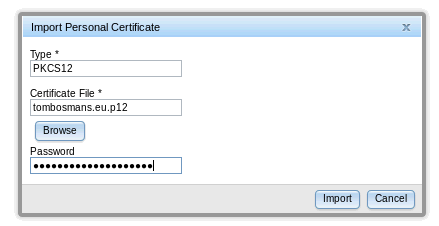
pdsrv keydb
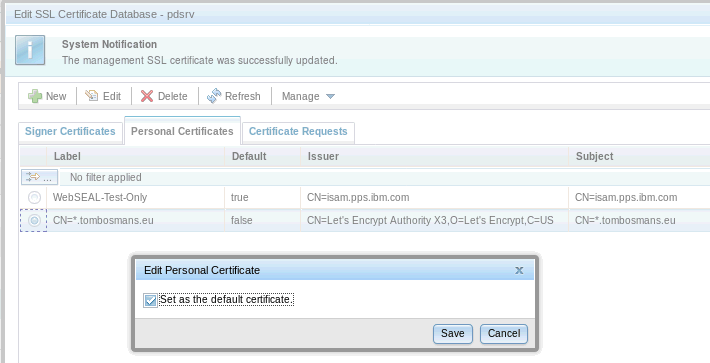
Edit the pdsrv keydb, go to Personal certificates and select “Import”
Then select the “Let’s Encrypt” certificate , click “Edit” and set it as the default certificate.
The DST ROOT CA is missing from the IBM provided keydbs (this is actually a bug in my opinion - see this link :
https://community.letsencrypt.org/t/dst-root-missing-from-p12/48648/4 ), so you need to add it to the Signer Certificates in all key databases basically. You can download it from the website in the link below, or you can export it from any modern browser (for example FireFox, below).
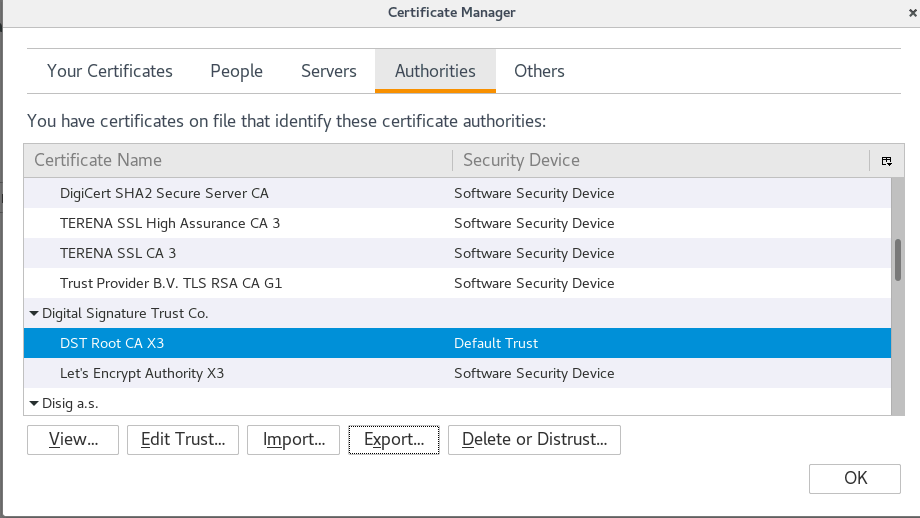
Note that the reverse proxy can’t handle the missing root CA, while the LMI does not seem to require it. In each case, any server you want to protect using ISAM that would use TLS/SSL and a Let’s Encrypt certificate would also require you to add this DST Root CA X3.
Note that HTTP/2 results in an ERR_SPDY_INADEQUATE_TRANSPORT_SECURITY error at this point !
You need to restart the reverse proxies after saving and deploying this.
5. End result
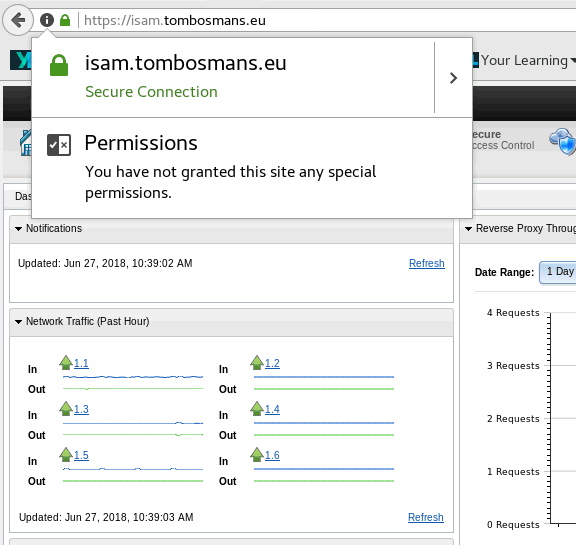
I can now access the LMI on this url :
… and the reverse proxy (using Chrome this time round)
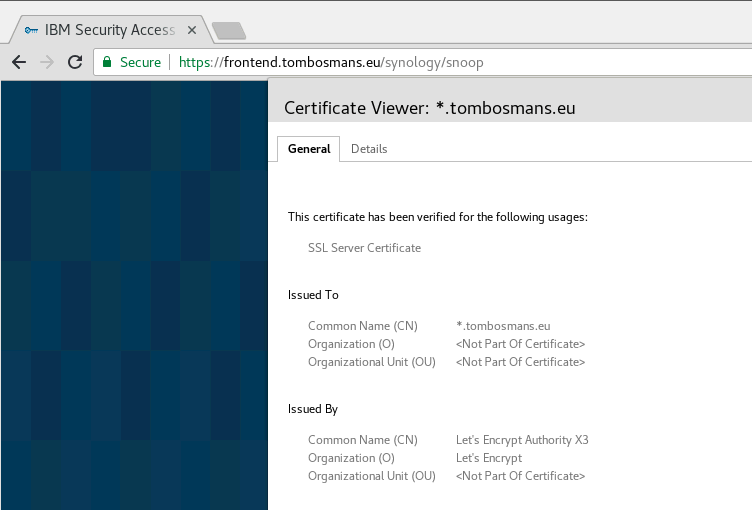
Everything is green, so everything is OK (at least , OK enough for my test environment).
Additional information
ISAM automation
To automate all these manual actions, I actually should use automation tooling like Ansible .
Fortunately , there is a publicly available repository with ansible-roles and playbooks for ISAM . It would be relatively straightforward to automate the management of the certificates here (generate a new one, use openssl to convert it, upload it to ISAM for the reverse proxies and for the management interface).
https://github.com/IBM-Security
My zonefile, for your information
This zonefile is obviously pretty specific to my DNS provider and to my situation, but still, it may serve as an example for what you would need to have to make this work .
It’s the _acme-challenge entry that does the trick .
$ORIGIN tombosmans.eu.
@ 28800 IN SOA ns1.domaindiscount24.net. tech.key-systems.net. 2018062619 10800 3600 604800 28800
@ 28800 IN NS ns1.domaindiscount24.net.
@ 28800 IN NS ns2.domaindiscount24.net.
@ 28800 IN NS ns3.domaindiscount24.net.
_acme-challenge 28800 IN TXT 9zE0cU5V1hiYo5HJWY-Zx6FW74gl1gd5P9dnS0G8cYw